Backpacking Training Plan: 28 Miles & 6,040 feet Elevation Gain
Do you have a similar backpacking trip in mind? Here’s a behind-the-scenes look at the backpack training plan I used to prepare for the Great Smoky Mountains and how you can do it, too:
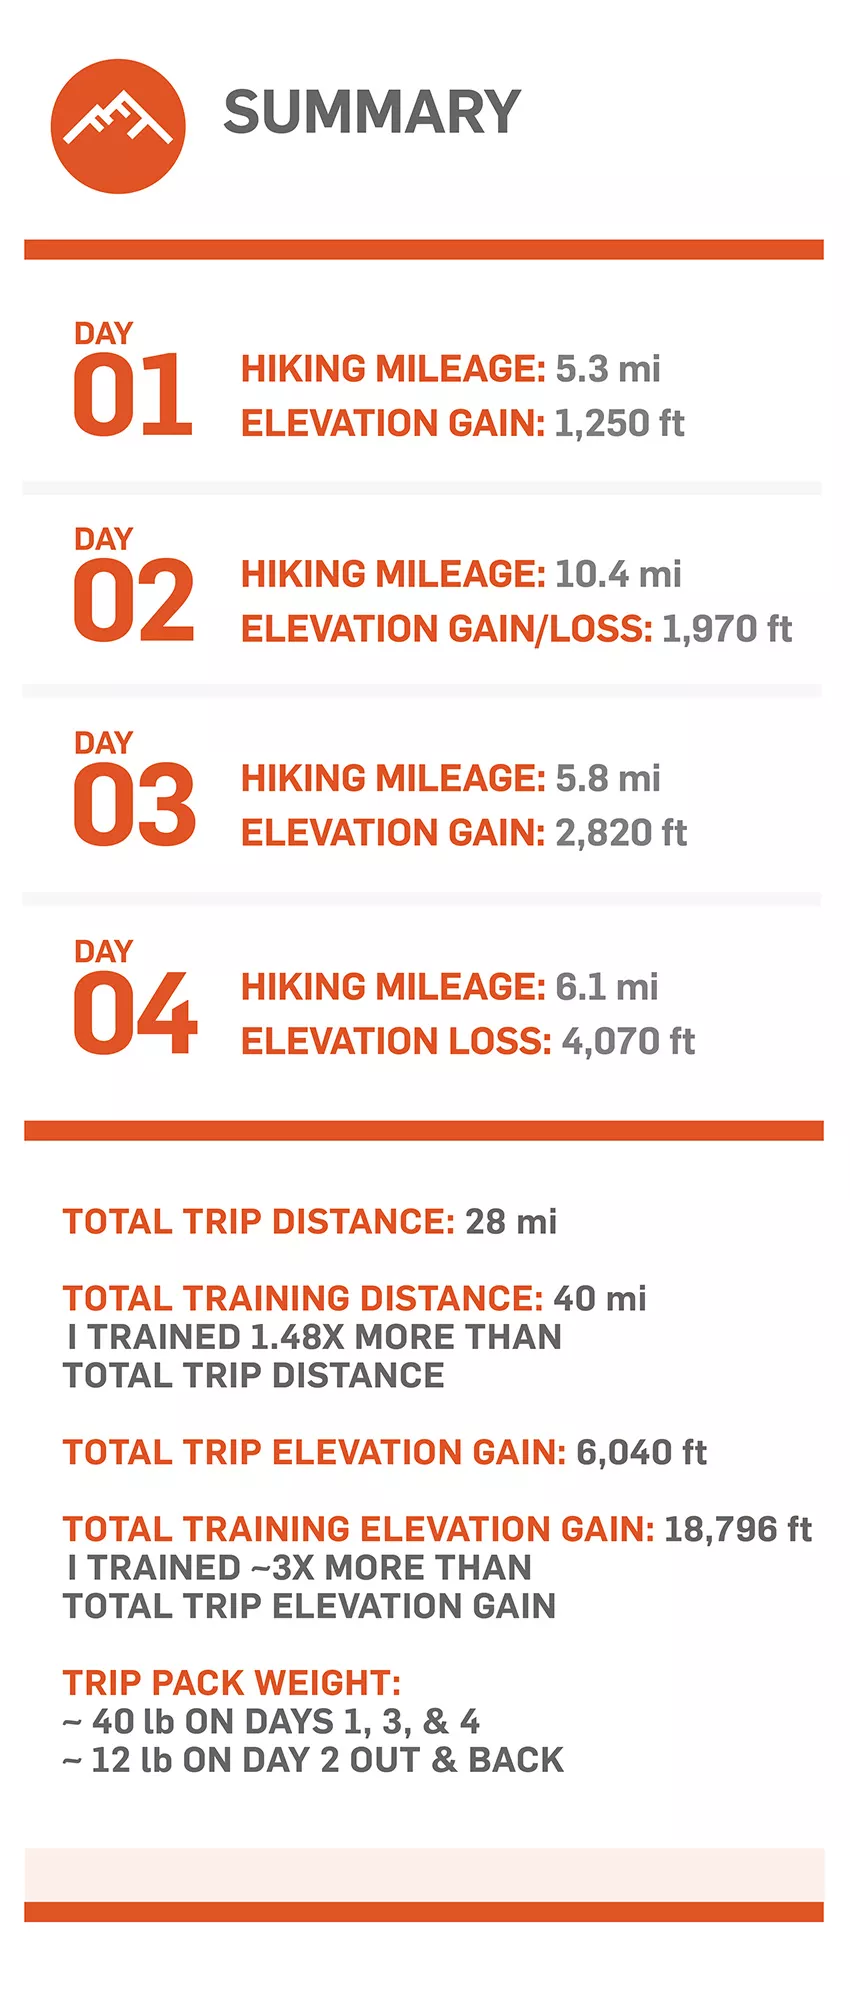
My buddy Justin and I returned from The Smokies and were extremely pleased with how we performed on the trails with our ~40 pound packs. We ascended Mount Cammerer peak on the Appalachian Trail on Day 2 and Mount Sterling peak on Day 3 and witnessed gorgeous mountain ridges, sunrises, and sunsets. Here’s a quick summary of our backpacking trip, training distances and elevation:
What do I need to prepare for a backpacking workout?
- Backpack: I trained with an Osprey 60L pack, which is the same one I wore on my trip.
- Pack weights: It’s important to load your pack with weight equivalent or more to what you’ll need on the trip.
- Lap counter: I used this tiny device to track data for my stair workouts and used this page to calculate elevation gain.
- Water bladder: It’s critical you stay hydrated during your hikes so you can apply the most training effort for greater return. In addition to carrying a bladder specifically for water, consider carrying a bottle containing a hydration formula to help maintain proper electrolyte levels and sustained energy.
- Shoes: Now – before your trip – is the time to test out footwear. I personally know that you can return shoes you are not comfortable wearing for exchanges or refunds.
Frequently Sold Backpackers Packs Under $200
I picked 3 quality brands with 100% guaranteed packs at moderate price points that come with a manufacturer’s warranty. They all have adjustable shoulder harness systems and have the features you need. Most backpackers should be able to get a good fit with these packs.
Granite Gear Crown2 60 Pack – Men’s
REI size and color availability good ($199.95)
Granite Gear Crown2 60 Pack – Women’s
REI size and color availability good ($199.95)
Osprey Rook 65 Pack – Men’s
Official Osprey site ($165.00)
Osprey Renn 65 Pack – Women’s
Official Osprey site ($165.00)
REI Co-op Trailbreak 60 Pack – Men’s
REI availability good ($149.00)
REI Co-op Trailbreak 60 Pack – Women’s
REI availability good ($149.oo)
Should your backpack training plan take your medical history into consideration?
Yes, of course… You should address your medical history by scheduling an appointment with an orthopedist or a physical therapist to deal with any current issues. You must avoid exacerbating them during training.
I had no medical issues as I segued into my training program. However, I did begin to develop pain in the lower/outside of my right foot as I increased my training volume. I immediately addressed this issue with incline board calf stretching 2x per day, stretching the big toe 2x per day, and massaging the bottom of the foot once per day by hand or with a roller.
I recommend this incline board, but used this one for my training because it’s what I have around.
You can use this roller or this more portable option for massaging the bottom of the foot.
I also decided to experiment with shoes to allay the foot issue. Although stretching and massaging solved the problem – I believe – the shoes helped avoid further issues. I started training with a decade old pair of La Sportive trail running shoes. They were worn and a too tight around my foot. I switched to ‘Balanced’ cushion Hoka One One Men’s Speedgoat 4 Gore-Tex.
Note: Hoka provides cushioning that range from Responsive to Balanced to Plush. I prefer ‘responsive’ (minimal cushioning so feet respond to and feel the terrain). I tried the balanced to see if I liked the extra cushion while carrying heavy pack weight. Conversely, I started feeling unusual pain in my feet. I decided to exchange for Hoka Men’S Toa Gore-Tex Responsive shoes instead. I ended up loving the feel and had no foot issues.
Your current training plan helps determine where your backpack workout begins
I was focused on general strength training for several months before my Smoky Mountains backpacking trip. 18 weeks before the trip – when I booked the itinerary – I decided to shift my focus to walking up and down stairs and hiking with pack weight. The muscular demands for the trip were such that I needed to be able to carry heavy pack weight for miles at a time while ascending and descending challenging terrain.
Below is my backpacking training plan. Use it to formulate your backpacking workout…
How did I structure my backpacking workout?
I structured a backpack training plan for myself using the variables in the itinerary (i.e., distance, elevation gain). If your backpacking trip is similar, then use my template to work from, or you can always ask me for advice. Training for 18 weeks was more than enough time, which meant I did not have to cram or risk overtraining by rapidly adding mileage, pack weight, and stairs too quickly.
The small weekly commitment I stuck to looked like this:
- Weeks 1-11 I walked stairs once per week.
- Weeks 12-18 I walked stairs once per week and hiked with pack weight.
- Every week I focused on my upper body and core to maintain general strength.
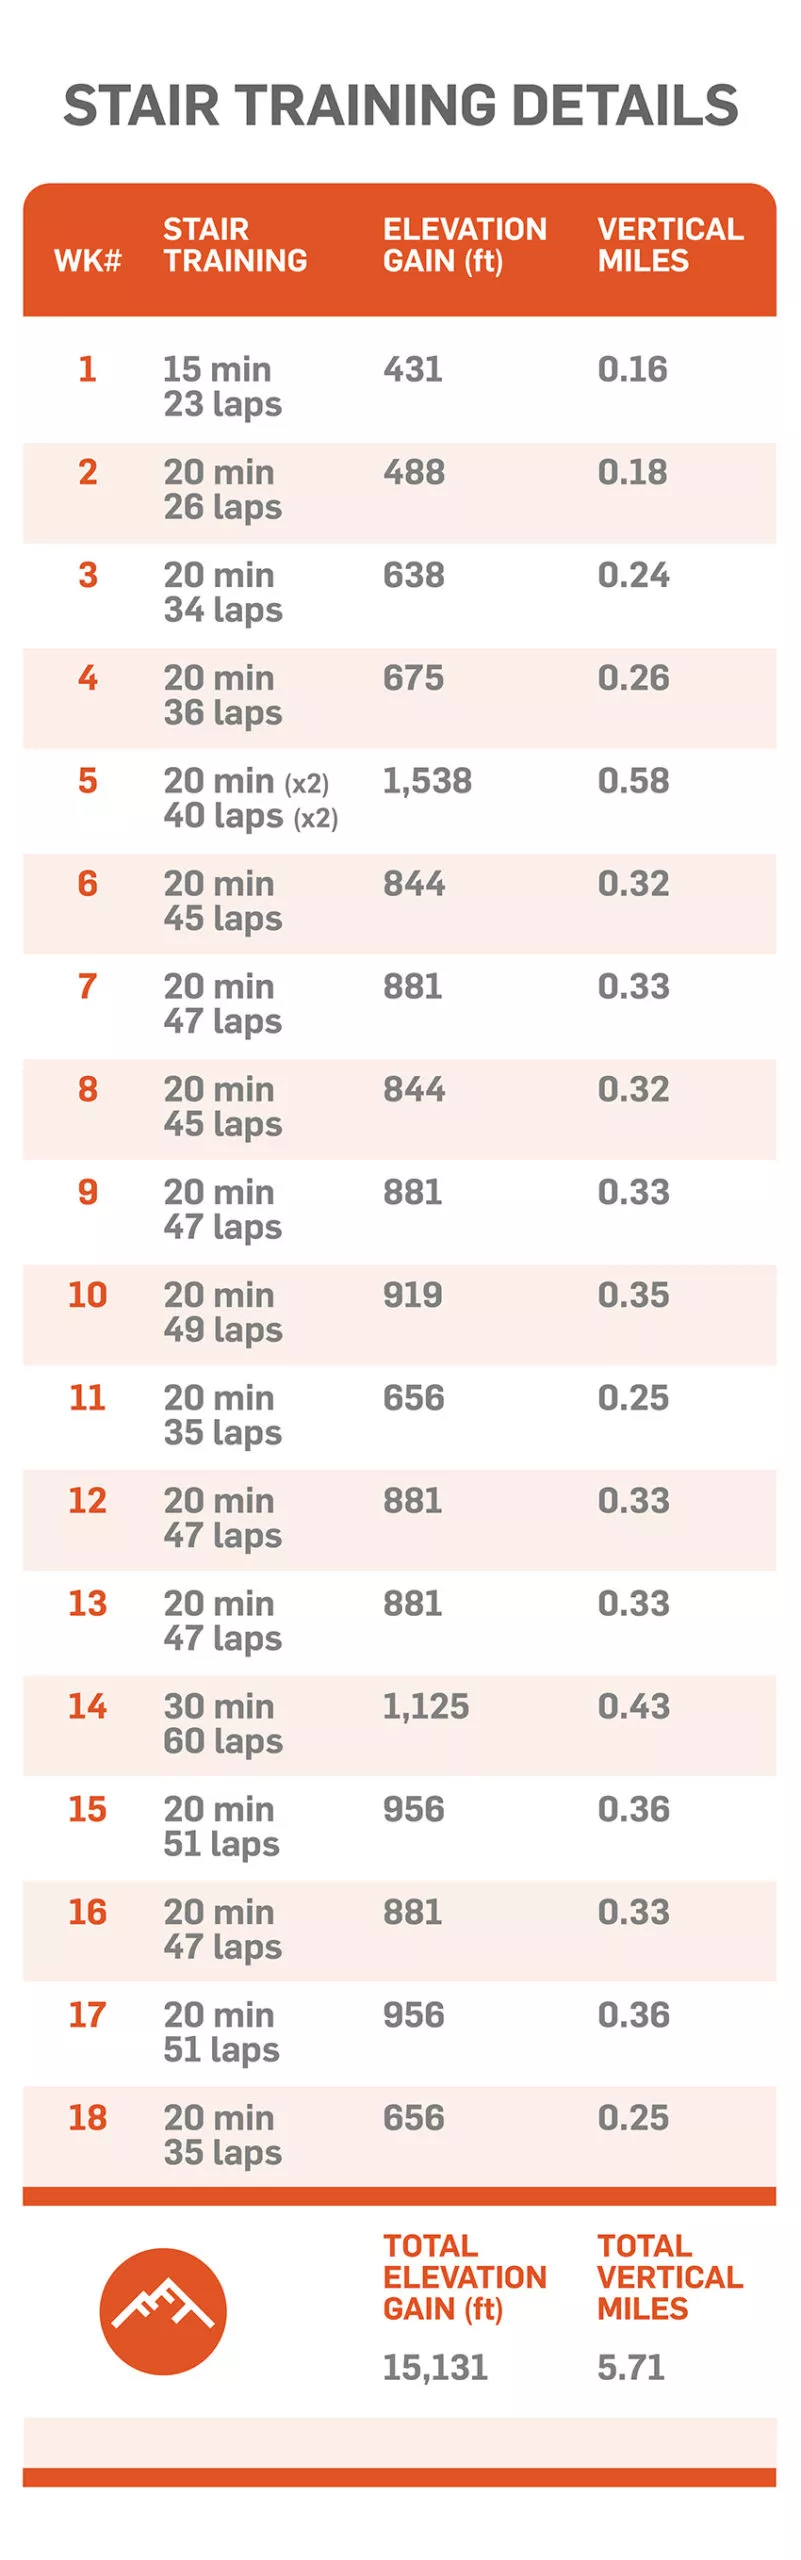
Stair Training Details
I gradually increased stair training intensity every week until I reached a plateau. Every workout was capped at 20 minutes. I increased the intensity by improving the amount of laps each workout. Laps are defined as such: the amount of times you climb to the top and walk back to the starting point. I took my time to avoid developing any chronic foot, ankle or knee issues and reached my peak at week 15 (week 14 I achieved 60 laps because I increased my time to 30 minutes). I used the Elevation Gain Stair Climbing Calculator to determine how many ascending feet (elevation gain) I achieved.
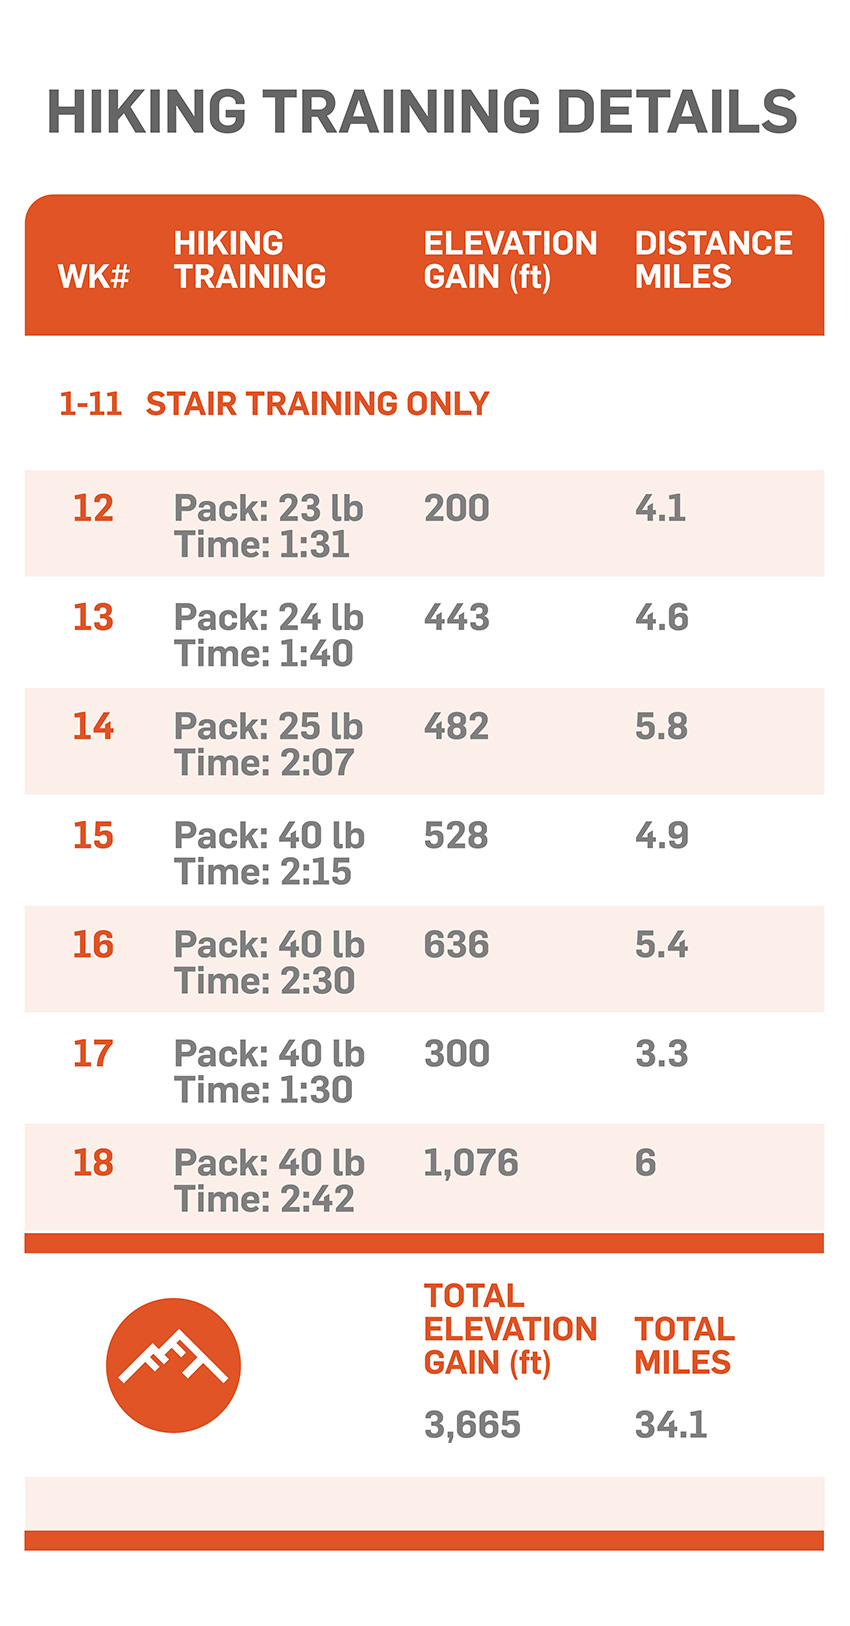
Hiking Training Details
I started hiking with a weighted backpack week 12. It was unnecessary for me to start earlier based on my current exercise history and knowing my potential from past backpacking endeavors. You should add more backpack training weeks if you need to boost your confidence about being ready. You can see that I bumped up my pack weight significantly from week 14 to week 15. I was confident my feet, legs and core could handle it. Notice the Training Elevation Gain was much more significant during stair training vs hiking training. I don’t have significant elevation changes in the topography close to me so I used the stairs to facilitate a lot of my climbing strength. You might have to do the same…
This is critical to understand about your backpack training plan
Most of you that want to add a boost of self assurance before you depart for you backpacking trip should add in an additional weekly training session on the treadmill, working up to 10% incline for 4 to 5.5 miles. Working up to 12% incline to overcompensate is a good practice, in which case you can train 3.5 – 5 miles. You should also consider adding some strength training for the legs 1x per week.
Ready to start training for your next backpacking trip? Schedule a consultation with me so we can discuss your training routine and get you set up for success.