Cori’s Best Hiking Exercise Picks – Round #1 of the Battle Royale
In this series, we will provide two different opinions regarding Best Hiking Exercise Picks. This is a battle royale of the best exercises for hiking. You’ll decide which ones win the privilege to be in your routine. If you want to throw your hat in the ring and submit a ‘best hiking exercise list’ then we can help you write and publish.
You’re reading Round #1 – Cori’s Best Hiking Exercise Picks
Round #2 – Clay’s Best Hiking Exercise Picks
Our society has a Top 5 or Top 10 list for everything under the sun. It’s understandable because most people can only remember small, easily digested chunks with so much information.
The “Top 10 Best Exercises for Hiking” is a classic example, but is it the right list for every hiker? Hikers are a diverse group that lives in cities, rural areas, and towns, which means that they might have to perform different exercises to prepare for hiking. That means a person who lives in New York City or Seattle can successfully summit Kilimanjaro and train differently.
A better approach for detailing the “BEST HIKING EXERCISE PICKS” is to allow several hikers the opportunity to share their ideas. Cori is a hiker who lives in Florida, and she is the first to draft her list. So, without further ado, read on and decide for yourself the “BEST HIKING EXERCISES.”
Cori’s Best Hiking Exercise Picks
1. Bulgarian Split Squat
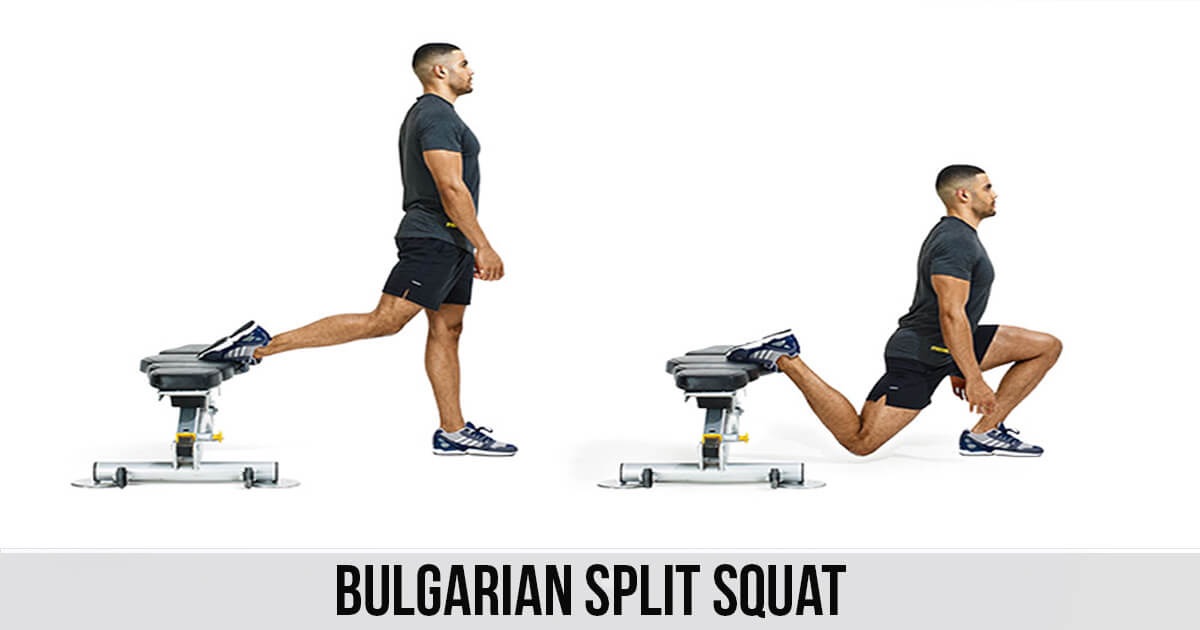 This hiking exercise is also known as ‘rear foot elevated split squat.’
This hiking exercise strengthens the muscles needed when going downhill. Muscle contractions going downhill are challenging because they lengthen as they contract. FYI these contractions are known as eccentric contractions.
Start by standing approximately 2 feet in front of a sturdy bench or chair, your feet hip-distance apart, your core engaged, your shoulders back, and eyes looking straight ahead. Pick up your right foot and place it on the bench behind you. Engage your core, and with your chest high, bend your left knee, allowing your right knee and ankle to passively bend as you move through the downward phase of the exercise. Do not take on the load with your back leg. Try to keep the pressure balanced evenly across your left foot as you lower downward. Hinge slightly forward at the hips, making sure your left knee remains aligned with your left toes (do not allow the knee to cave inward or bow outward). Once you reach the downward position, fire your left glute and quadriceps to power through the upward phase and return to standing on your left leg. Exhale as you press to standing. Then repeat with your other leg.
The main thing to remember about the Bulgarian split squat is that it takes some trial-and-error to find proper foot placement to perform this hiking exercise comfortably. You’ll place one of your feet on a bench behind you, but you may need to hop your front foot around a little bit to find the exact position that feels stable. If your quads are tight, you might need to use something much lower, like a 10-inch aerobic step. It’s okay to try a few practice repetitions before starting your actual set to make sure you’re set up appropriately.
2. Bench Step-Ups
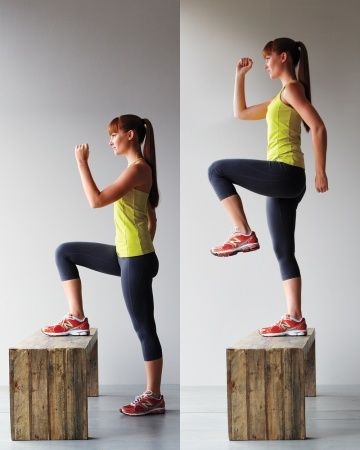 Stepping up to and off tall objects such as boulders becomes more manageable and safer after weeks of performing this exercise.
This hiking exercise is a powerhouse for boosting your bodyweight upward while challenging your balance and weight transfer from one leg to another. This exercise will help you with inclines and replicate stepping up to high rocks and fallen trees. To do a step-up, you’ll need a stable utility bench, plyometric box, or the second stair from the bottom of a staircase.
Start by standing with your feet hip-width apart, approximately 2 inches from the box, bench, or stair. While maintaining good posture, push primarily through your lead foot, and lift your body onto the step. Be sure to contract your glute muscles at the top; that ensures you achieve sufficient hip extension. Then step down to the starting position. Be sure to keep your abdominal muscles nice and tight during the entire exercise. Keep your foot is planted entirely on the step or bench.
It’s okay to start with a low step height of 12 inches. If your balance is insufficient, finish with both feet on top of the step instead of a single leg stance.
3. Side Lunge
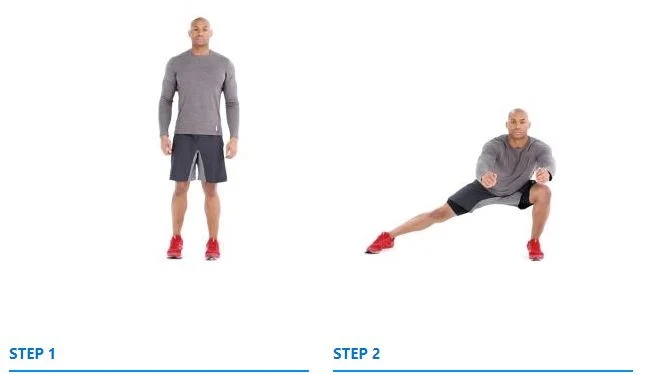 Side lunges add what exercise professionals sometimes refer to as ‘east to west’ training.
Often overlooked as a hiking exercise is the side-to-side strengthening needed for quick movement shifts on the trail or when you have to navigate downhill sideways. Start by standing with the feet hip-width apart. Step directly to the left, lowering the hip and buttock down to 90 degrees of knee flexion. Then push off on the left hip by firing the glute and quadriceps to return to the starting position.
4. Superman Extension
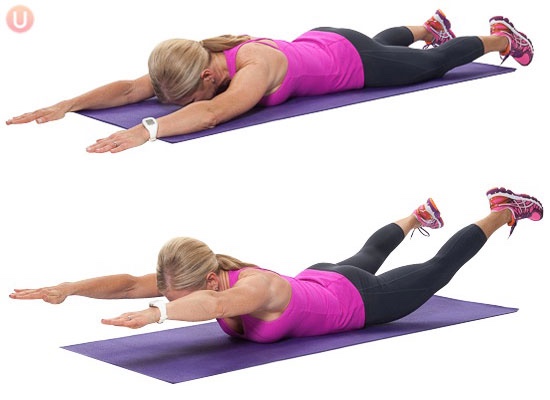 This hiking exercise is an exception to the other movements because it is non-weight bearing.
Start by laying on your stomach with your legs extended, ankles slightly plantarflexed (toes pointing away from your shins), and arms extended overhead. Relax your head to align it with your spine. Contract your abdominal and core muscles to stabilize your spine. Slowly raise both legs and both arms a few inches off the floor simultaneously. Maintain your head and chest in the same plane (do not raise your head so that your eyes can’t see the mat). Contracting your glutes at the top is an integral part of the movement. Hold this position for 1-5 seconds, then slowly lower your arms and legs to the starting position.
5. Squat with Weighted Vest
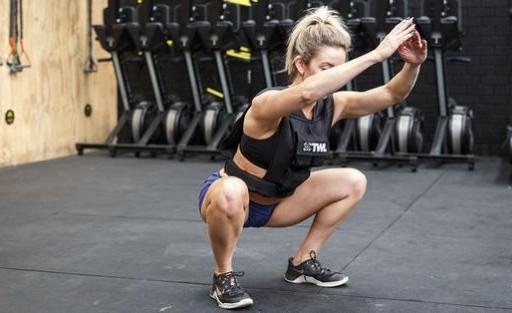 You can wear a weighted vest with most hiking exercises.
For most, wearing a weighted vest adds additional bodyweight, approximately 5% to 10%, which increases the demands on your muscles and cardiovascular system. This will simulate the weight of a backpack. Although your center of gravity is shifted differently in a vest than wearing your backpack, it’s a specific enough movement to provide positive results that translate to ascending and descending. In the article How to Train for Downhill Hiking, you can read about selected weighted vests.
Start by standing with feet slightly more than shoulder-width apart – toes pointed slightly outward. Bend at the knees, squatting low, until the knees form a 90-degree angle with the floor. Hinge at the hips, letting your chest and torso angle slightly toward the ground as you see in the image above. The person above demonstrates a perfectly executed squat that many exercisers cannot replicate. If your torso and chest pitch too far forward as you bend your knees to 90 degrees, then slide weight plates about 1/4 to 1 inch thick under your heels.
6. Stair Climbs
 Stair workouts rank high on surveys for best hiking exercises.
Climbing stairs helps build lower body strength and endurance needed to motor you upwards during a steep hike. However, every climb to the top requires a descent; stair training will deliver significant training results for downhill competency, but I digress. Find a safe and stable set of stairs. Good locations to start are sports stadiums at local schools, parking garages, office buildings, and home staircases. Although tedious, a set of 10 stairs will do the trick.
Start by climbing all the flights of stairs and then return to the bottom. You can choose to walk or bound up the stairs based on your cardiovascular fitness level. This page contains some useful stair training ideas.
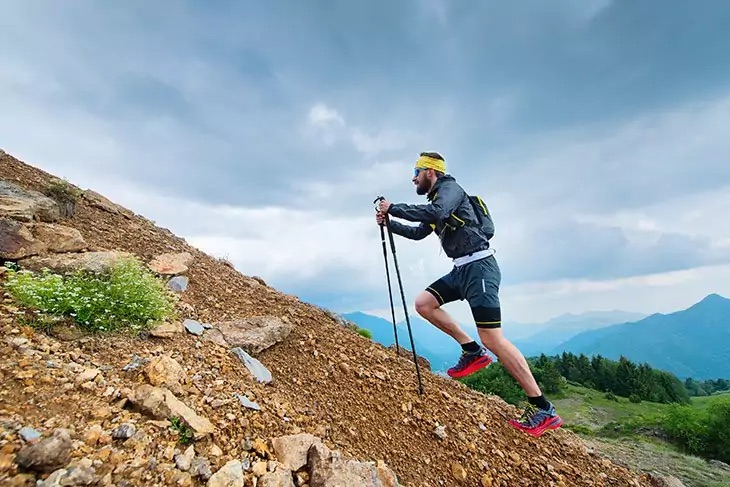 Just a cool picture of a dude performing a hiking exercise by actually hiking on steep inclines. Not practical for city folks.
What’s necessary for selecting the best hiking exercise?
Getting into hiking shape requires attention to lower body strength, core stability, and functional movement training. Maintaining your strength for downward movements is just as crucial as upward and side movements during a hike. Hiking exercises such as step-ups mimic movements required of the body during your hike. Core stability is vital and stimulates hiking through a weighted vest and is supplemented by exercises such as the Superman Extension. Both strengthen and stabilize the core, so your upper and lower limbs move in sync to provide efficient hiking movement.
Disclaimer: Exercise is not without its risks. This or any other exercise program may result in injury and/or death. Any person who undertakes these exercises does so at their own risk. To reduce the risk of injury, you should consult your doctor before beginning this or any other exercise program. As with any exercise program, if at any point during your workout you believe conditions to be unsafe or start to feel faint or dizzy, have physical discomfort, or pain, you should stop immediately and consult a physician. It is important to perform exercises correctly to avoid injury. You should also acquire help and teaching to undergo any new exercise program safely.
