Hiking Exercises to Prevent Ankle Injuries
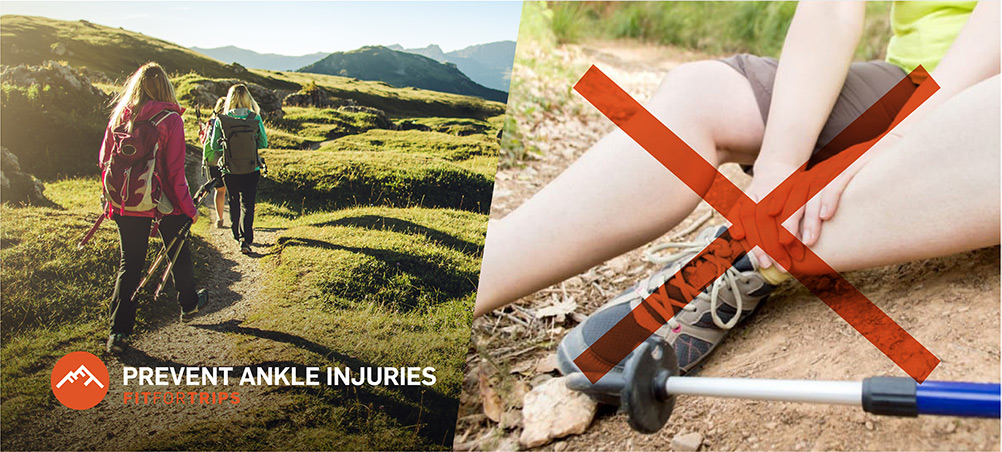
Whether hiking, trekking, or backpacking, an ankle injury can be a painstaking setback for any adventure traveler. Engaging in hiking exercises to improve your mobility, ankle strength, and the perception of the position of your body are the most effective methods of ankle injury prevention. Add these exercises and stretches to your workout routine to build your strength, balance, and flexibility:
Multi-Directional Ankle Strengthening Hiking Exercises
Adequate ankle strength is necessary for stability, which allows normal movement patterns. The ankle joint moves in multiple directions including inversion (inward), eversion (outward), dorsiflexion (upward), and plantar flexion (downward). Gaining strength in all four directions is important for preventing future ankle injuries.
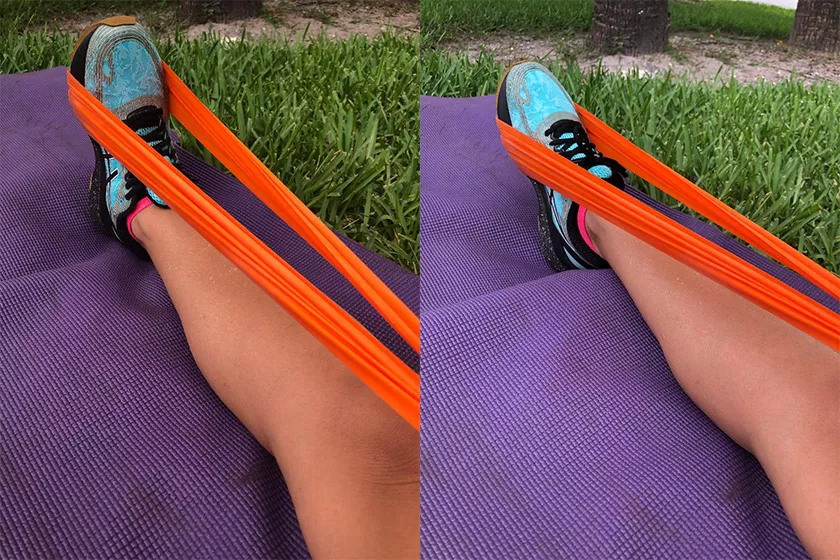
Resistance bands are excellent tools to prevent ankle injuries. Examples of high-quality bands include Power Systems REP Band and Theraband by Perform Better. Hiking exercises should include using the band of your choice to perform sets and repetitions of resisted ankle inversion, eversion, dorsiflexion, and plantar flexion. Start with 2 sets of 12 repetitions in each direction and progress until you can perform 3 sets of 15. Below you can see how to use the bands in different hiking exercises to strengthen the ankle in all four directions.
Ankle Inversion Exercise

Sit on the floor with the legs outstretched and wrap the band around the foot you want to work and tie the other end of the band around something sturdy positioned outside of the leg. Perform inversion by keeping the lower leg still and trying to point the toes across to the other leg.
Ankle Eversion Exercise

Still sitting on the floor, keep the loop around the same foot but move the anchor of the band so that is now on the other side of the body. Perform eversion by turning the foot out and trying to point the toes away from the other foot.
Ankle Dorsiflexion Exercise

Sit on the floor with one knee extended and the other flexed. Make a loop with the band around the ankle of the extended knee and securely attach one end of the loop to a stable surface 2-3 ft away. Place the exercising foot inside the loop. Start by pointing the toes and ankle as far forward as possible. From this starting position slowly pull the band towards the head and body until the ankle reaches a 90 degree angle or end position. Repeat for 12-15 repetitions. You can start with 1 set and increase to 2-3 sets as you increase strength.
Ankle Plantar Flexion Exercise
Sit on floor with one knee extended and the other flexed. Loop the band around the ankle of the extended knee and securely hold the other end of the band. Place the exercising foot inside loop. Start with the ankle and toes pulled back towards the body as far as your range of motion allows. From this starting position slowly push the band away from the body as far as possible until you reach a comfortable end position. The motion is similar to pushing down a gas pedal in a vehicle. Repeat for 12-15 repetitions. Increase to 3 sets as you improve strength.
The Best Proprioceptive Hiking Exercises
Proprioception, the perception of the position and movement of the body, is mediated by proprioceptors, mechanosensory neurons located within muscles, tendons, and joints. They sense where the body is and help maintain balance when outside forces challenge it. Studies have shown that proprioceptive exercises are effective at preventing ankle injuries in the physically active population, both those with and without a history of ankle injury. Add these proprioceptive exercises to your hiking workout to prevent ankle injuries:
Single Leg Balance Exercise

This exercise is a great way to get started with balance training on a stable surface and does not require any equipment. Be sure to choose a safe space near a table or chair nearby to prevent falls as needed while performing this exercise.
Begin by standing on a flat surface with your arms stretched out to your sides like you are making the letter “T.” Then lift your right leg off the floor, bending it at the knee. If you are not steady on your feet, use one hand to hold on to a chair, counter, or wall. While standing on your left leg, keep your knee straight and try to balance for 30-60 seconds. Immediately switch to the other leg and repeat the challenge. Repeat this exercise 3 times on each leg. When you can balance for 60 seconds with your eyes open, progress to performing it with your eyes closed for 10 seconds on each leg.
Cone Drill

For this exercise you will need 3 cones that are between 6-12 inches in height. Some great options for cones include these 12 inch colored cones, or for a greater challenge, the 6 inch agility cones. Begin by placing the 3 cones in front of you, each about two feet apart and in triangle formation. Balance on one leg slightly behind this triangle and centered to the middle cone. With the opposite hand from the leg you are standing on, reach out laterally to touch the first cone. Bend at your hip, knee, and ankle. Return to your upright starting position and repeat by leaning over to touch each. Touching all three cones makes one repetition. Do 3 sets of 5-10 repetitions.
Balance Pad Exercises
Dynamic balance and ankle control can be developed by training on an unstable surface such as a balance pad, pillow, or even in an area of grass. The Airex Balance Pad is the most challenging of the three suggestions. Whichever unstable surface you choose, start with the beginner exercise and progress towards the more advanced exercises over time. If you start out too advanced, you may actually incur what you’re trying to avoid – an ankle injury. Use the following exercise descriptions and images as a guide:
Beginner: Start with a two-legged balance and stand upright with feet shoulder width apart for 10 seconds. Increase to 60 second holds in this position. Once the two legged holds become easier, you can progress to performing repetitions of a half squat on the balance pad. Start from the upright position with your feet shoulder width apart and then slowly maintain your balance as you perform a squat until your legs are slightly less than parallel to the ground.

Intermediate: The next progression is to perform the diagonal tandem stance hold. Place one foot behind the other on the Balance-pad. Push the ball of the big toe actively into the pad and hold the tension for 10-60 seconds. Maintain an upright posture. Switch your feet. Repeat 2 times on each leg.

Advanced: A single leg balance on the unstable surface is the most advanced progression and requires a high level of balance and coordination. Be sure to choose a safe space where you can hold a table or chair to prevent stumbling until you have the confidence to let go. Step onto the surface, then lift one leg. Work towards a 60 second hold. Once you can perform for a minute on each leg, begin reaching up/down and left/right with your arms to increase dynamic ankle stability and balance. You can also increase difficulty by moving your suspended knee repeatedly up and down. Increase difficulty a step further: hold a 4-6 pound medicine ball and move it up and down as well as side to side and rotationally.

Balance Board Training
Balance boards have been used for decades to improve balance, coordination, and postural control, as well as preventing functional instability following an ankle injury. Proprioceptive wobble board (a.k.a. rocker and balance boards) exercises have also been demonstrated to be as effective as braces and tape to prevent ankle injuries by assisting in strengthening the muscles and ligaments, influencing reaction times, and restoring proprioception of the damaged structures around the ankle. Perform Better makes quality and affordable 16” wobble boards and rocker board options.
Wobble Board Exercises

An effective wobble board ankle exercise to prevent ankle injuries is the 2-Legged Balance Circles. Perform this exercise by placing both feet on the board approximately shoulder width apart. Hold on to a chair for support if needed and rock the board forwards and backwards, then side to side. Do this for 30 seconds or 2-3 times. Progress by adding 10 seconds at a time until you reach 60 seconds. Next perform the more advanced single leg balance holds by placing one foot at the center of the board. Attempt to keep the board parallel to the ground while holding your arms out to your sides. Increase difficulty by rocking the board forwards and backwards, then side to side. Avoid hyperextending (over-extending) your knee. Hold for 30-60 seconds. Repeat 3 times on each foot.
Lateral Movement Agility Exercises
Side to side movement is paramount to preventing ankle injuries. Studies have shown that most ankle injuries happen when the lateral aspect of the ankle gives way and bends beyond normal. Training side to side movement and change of direction will prepare the ankle to react properly when faced with extra forces from the lateral (out-side of ankle) or medial (in-side of ankle) side. Begin with side movement using the side lunge technique to get your ankle use to engaging in side movements. Perform side lunges in direction of both left and right side for a distance of 15ft. Start with one set and gradually progress to 3 sets.
Once you have mastered side lunges, progress to performing the side shuffle cone drill. This exercise will increase the challenge as you add a side shuffling motion and quickly change directions once you touch the cone. Using a cone as a place marker for each side is ideal. I recommend these cones.
The Slide Board Exercise is the final stage of progression toward preventing ankle injuries. It will require equipment that creates a frictionless surface to move side to side on at varying speeds. You can purchase a slide board such as the Goaler Roll-Up Slideboard. An excellent slide board exercise to begin with is the side-to-side slide. Start by placing the booties that come with your slideboard over your shoes and carefully place both feet onto the board. Start on the right side of the board. Slide your left foot laterally to the left as you press your right foot against the right bumper to continue the movement. As you slide, your feet should remain about shoulder width apart until you reach the other bumper. As your left foot is about to touch the left bumper, lift your right foot off the board to help you catch your balance as your left foot makes contact. After your left foot touches, place your right foot on the board again and slide laterally to the right as you press your left foot against the left bumper, returning to start. Continue the side-to-side-slide exercise for 1-2 minutes swinging your arms comfortably as you slide. You may repeat 3-5 times. Be sure to keep your knees slightly bent during the exercise.

Hiking Exercises to Improve Your Lower Leg Flexibility
The ankle is an attachment site for a variety of major and minor muscle movers of the lower leg, therefore lower leg flexibility is paramount to any ankle injury prevention program. Try these static stretches after hiking, backpacking, or any outdoor adventure to alleviate muscle tightness and delayed onset muscle soreness (DOMS):
Calf Stretches
Downward dog, a common yoga pose, and a wall calf stretch are great practices that do not require any equipment. Another excellent and effective calf stretch can be performed using a calf stretching tool such as Perform Better’s Single Pro Stretch. Hiking Training Solutions provides a stretching strap that incorporates a hamstring stretch in addition to the calf and Achilles tendon.
Downward Facing Dog Pose: Start on all fours, with wrists under shoulders and knees under hips. Step feet back to come into a high plank position. Send hips up and back so your body forms a triangle with the ground. Keep your spine straight, think about pointing your sit bones toward the ceiling and pressing chest to thighs, not placing too much weight on your hands and arms. Bend your right knee as you push your left heel into the ground, feeling the left calf stretch. Hold the position for 10 seconds then repeat with the other leg. Do 3 sets.
Wall Calf Stretch: Stand a little less than arm’s distance away from the wall. Step your left leg forward and your right leg back, keeping your feet parallel. Bend your left knee and press through your right heel. Hold for 20 to 30 seconds and switch legs.
Tibialis Anterior Stretches: If you have tight shin muscles or pain, you may want to spend some time stretching your anterior tibialis muscle. If you prefer the standing method, use the standing shin stretch, or try the kneeling shin stretch if you have a mat or comfortable surface.
Standing Shin Stretch: From the standing position may want to use a hand on a wall or other support for balance. Bend both knees slightly. One foot remains squarely on the ground. The foot to be stretched is placed just behind the stable foot, with the toe of the stretching foot touching the ground. Keeping your toe firmly on the ground, pull the stretching leg forward so you feel a stretch from the top of your stretching foot through your shins. Once you feel a good stretch, hold it for 15 to 30 seconds. Repeat the stretch with the other foot. 2-3 sets are optimal.

Kneeling Shin Stretch: Kneel on a mat with the tops of your feet flat on the floor and your buttocks over your heels. Hold for 15 to 30 seconds. If this does not elicit a stretch, lean back keeping your back straight until you feel a shin stretch. Repeat 2 times. Discontinue if your knees bother you.

Slant Board Calf Stretch: This is a preferential stretch over the Wall Calf Stretch if you want to invest in a Slant Board.
Hiking Exercises for Before and After a Hike
The ankle stretches we just laid out will help you reduce chance of ankle injuries during a hike, but here are a few tips to add to your hiking workout routine to deal with any pains that might crop up.
Ankle Stretches Before Hiking
Whether you are going on your first hike or you are an avid hiker, it is important to know how to prepare your body for the hike. Hiking preparation often focus on what to bring, what safety precautions to follow, and where to go, but how to get in shape for hiking is usually overlooked. It is important to perform dynamic stretching to warm up the muscles and get them ready for the adventure. Dynamic stretches involve quick controlled movements that prepare the body for functional movement associated with the activity ahead. For the ankle and lower leg, here are a few dynamic stretches that will help you avoid any serious ankle injuries:
Heel to Toe Walks: Start by walking on the balls of your feet for 10 paces, then walk on the heels while keeping the balls of your feet off the ground for 10 paces. Alternate again 2-3 times for each. Afterwards, you should feel a good warm-up of the calf and shin muscles.
Inch Worm: From a push-up position, slowly walk your feet towards your toes. Keep your knees and elbows straight and your back as flat as possible. When you can’t walk your feet forward any more, slowly walk your hands forward until you’re back in a push-up position. Repeat 3-5 times.
Lateral Lunge: Face sideways and take a big step to the side. Lean to that side and straighten out the knee of the opposite leg. Stick your butt back, keep your weight on your heels, and keep both feet pointed straight forward. Then, switch sides and lean towards the opposite leg before stepping back up to center. Do at least five steps to the left and five steps to the right.
Easing Calf Pain After Hiking
Hiking can be tough on the lower body, especially if you are carrying the added weight of a backpack or water source. Pain in the lower legs after hiking that is dull and achy is often associated with muscle soreness or a large shift in muscle use. It is important to pay attention to your body and identify the pain level and characteristics. For dull achy pain, static stretching and massage is helpful. A self-massage tool such as a massage gun will do the work for you as the head pulses into your calf muscle for relief.

You should consult an orthopedic physician for further evaluation if you have sharp pain over bony areas or pain that lasts more than 5-7 days. If inflammation is associated with your calf pain it is important to receive evaluation from a medical professional; however, performing rest, ice, and elevation will be beneficial until then.
How to Prevent Hiking Foot Pain
Hiking is a rewarding experience and a great way to stay fit, but it can really take a toll on the feet. Taking care of the feet is vital to returning to the trail to hike another day. Common conditions of the feet that can develop while hiking include blisters, plantar fasciitis, and fungal infections such as athlete’s foot. Prevent foot pain by checking to ensure the weight is evenly distributed in your backpack and that your straps are secure and allow your pack to be in a good position on your back. Wear proper fitting shoes for the trail as well as soft insoles that provide cushion. You should also perform a good dynamic warm-up to ensure your lower leg muscles have proper circulation and your joints are moving fluidly prior to the hike. When you return home from your hike, you can massage the bottom of your foot with this vibrating foam roller or the round head attachment of the massage gun.
Easing Ankle Pain After Hiking
Hiking places loads on the hip, knee, and ankle. The weakest link is most often the ankle, and for that reason the foot and ankle tend to swell and throb. This happens when either boots or shoes are too tight or in response to the pounding on the ground that can lead to increased inflammation. Counteract the ankle pain by taking frequent rest breaks and ensuring you have sufficient arch support with hiking insoles. Some recommended insoles for hiking include:

5 Ankle Safety Tips for Hiking
Careful preparation can keep you safe on the trails and help reduce the likelihood of ankle injury. Here are some safety tips to keep your ankles working their best:
- Be sure you’re wearing either hiking boots or trail shoes.
- Protect toes from blisters and toenails from bruises by making sure your footwear fits properly. Your toes lengthen while moving so the average recommendation is at least 3/8” to 1/2″ space from the end of your longest toe to the end of the shoe while you are standing.
- Select material for socks that wick away moisture, are breathable, and protect from the either hot or cold weather conditions.
- Know the hiking route and options for accessing medical assistance.
- Carry supplies or a first aid kit that includes elastic bandages and wraps to help immediately protect and stabilize injured feet and ankles.
Want to learn more about getting in shape for a hiking adventure while protecting yourself from ankle injuries and other problems? Contact us and get fit with a complimentary fitness consultation.
References:
Freeman MA, Dean MR, Hanham IW. The etiology and prevention of functional instability of the foot. J Bone Joint Surg Br. 1965;47(4):678‐685. Retrieved June 2, 2020 from http://www.thetallcyclist.com/wp-content/uploads/2016/02/Freeman-et-al.-The-Etiology-and-Prevention-of-Functional-Instability-of-the-Foot.pdf
Outdoor Foundation. 2018. Outdoor Recreation Participation Report 2018. Boulder, CO: Outdoor Foundation. Retrieved 1 June 2020, from Outdoor Foundation: https://outdoorindustry.org/resource/2019-outdoor-participation-report/
Proprioception [Def. 1]. In Merriam Webster Online, Retrieved June 4, 2020, from https://www.merriam-webster.com/dictionary/proprioception
Rivera MJ, Winklemann ZK, Powden CJ, Games KE; Proprioceptive Training for the Prevention of Ankle Sprains: An Evidence-Based Review. J Athl Train. 2017 Nov; 52(11):1065-1067.
Shah, S., Thomas, A. C., Noone, J. M., Blanchette, C. M., & Wikstrom, E. A. (2016). Incidence and Cost of Ankle Sprains in United States Emergency Departments. Sports health, 8(6), 547–552. https://doi.org/10.1177/1941738116659639
Thomas W. Kaminski, Alan R. Needle, Eamonn Delahunt; Prevention of Lateral Ankle Sprains. J Athl Train 1 June 2019; 54 (6): 650–661. doi: https://doi.org/10.4085/1062-6050-487-17
Waterman, Brian R., MD1; Owens, Brett D., MD2; Davey, Shaunette, DO1; Zacchilli, Michael A., MD1; Belmont, Philip J. Jr., MD1 The Epidemiology of Ankle Sprains in the United States, JBJS: October 6, 2010 – Volume 92 – Issue 13 – p 2279-2284 doi: 10.2106/JBJS.I.01537
Disclaimer: Exercise is not without its risks and this or any other exercise program may result in injury and/or death. Any person who undertakes these exercises does so at their own risk. To reduce the risk of injury you should consult your doctor before beginning this or any other exercise program. As with any exercise program, if at any point during your workout you believe conditions to be unsafe or begin to feel faint or dizzy, have physical discomfort, or pain, you should stop immediately and consult a physician. It is important to perform exercises properly to avoid injury, it is recommended that you acquire help and teaching in order to undergo any new exercise program safely.
ellie davis
I was not aware that proprioceptive exercises are effective to prevent ankle injuries. My husband and I are thinking about how to prevent future injuries, and we are looking for advice. I will make sure to follow your recommendations to prevent future injuries.