How to Prevent Lower Back Pain After Walking and Hiking

Lower back pain has many causes and degrees, though for hikers and adventurers, most lower back pain after walking or hiking is considered acute. This means it is short term pain that lasts a few days to a few weeks that is caused by carrying something heavy, twisting or bending incorrectly, or develops after strenuous activity is performed. Sprains, strains, and spasm are the most common causes of lower back pain in physically active individuals, but other conditions such as disc degeneration, weak core musculature, nerve compression, and sudden accidents or falls also play a role.
Is Hiking Bad for Your Back?
Unless you have been diagnosed with a back problem or had back surgery, the answer is no; hiking is not bad for your back. That’s why it is important to start by assessing your current status to reduce your incidence of lower back pain after hiking. Muscle tightness, improper posture, and weak core stabilizers have been identified as key contributors to development of lower back pain. With that in mind, assessing your level of flexibility, postural control, and core stabilization will be crucial in determining your lower back needs. Here are some techniques to help you assess your lower back and identify your personal strengths and weaknesses:
PART 1: Assess Lumbar Flexibility & Motion to Reduce Lower Back Pain
Research has shown that relationships exist between flexibility and low back pain. Several studies have found correlation between tight hamstring musculature and increased risk of lower back pain. This is due to compensatory movements of the pelvis and lumbar spine when muscle groups such as the hamstrings, gluteals, psoas, and piriformis are restricted by lack of flexibility. Overall, tight lower extremity muscles increase stress on the spine and can put a person at risk for lower back pain. Use the following tests to assess your personal level of flexibility and range of motion of the lower back to reduce back pain after walking and hiking. Note: some tests require the observation of another person to identify weakness, movement compensation, limitations, and positive findings.
90/90 Straight Leg Raise Test:
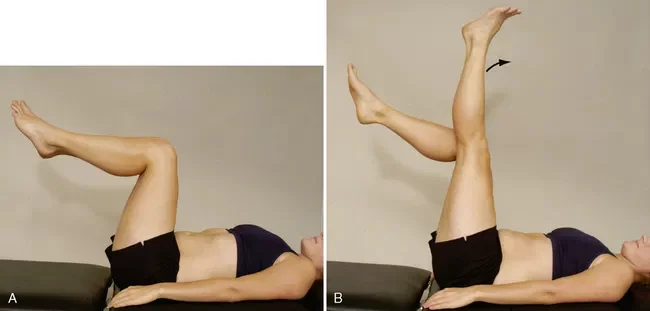
Begin by laying on your back on a flat surface. Flex your hips and knees to 90 degrees. Maintain this position and grasp behind each thigh to stabilize your hips. Next, straighten one leg as much as possible. Bring the leg back to 90 degrees and repeat for the other leg. For this test, hamstring muscle tightness is indicated if either leg is unable to extend the knee within 20 degrees of full knee extension. The optimal range for hamstring flexibility is 80-90 degrees flexion.
Lumbar Spine Active Range of Motion (AROM) Assessment: Perform each movement while standing. Have someone observe your differences in range of motion (ROM) and any compensation mechanisms. Painful movements should be omitted. During the movements, the observer can look for limitations due to possible causes such as pain, spasm, stiffness, and/or imbalances.
Flexion: 40-60 degrees of movement, watch for compensatory movements in thoracic spine. The normal curve in your lower back should flatten. Watch for jerky or painful movements and note how far forward the person performs the flexion.
Extension: 20-35 degrees of movement, the person must place their hands on their hips in order to stabilize the movement and not compensate with pelvic movements.
Lateral Flexion: 15-20 degrees, the person runs their hand down the side of the leg while attempting not to make any forward or backward movements. Compare with other side and note the amount of rotation performed together with the flexion.
Rotation: 3-18 degrees, can be performed standing or sitting to eliminate compensatory hip movement.
Seated Piriformis Test:

The piriformis muscle is a lateral rotator of the hip and runs over the top of the sciatic nerve. Tightness of this muscle often leads to sciatic nerve pain and can contribute to lumbo-pelvic-hip pain. Use this test to detect tightness of the piriformis or detect sciatic nerve irritation. Begin by sitting on a chair with your back upright and feet resting on the ground. Cross the affected leg and place the ankle of the affected leg on the unaffected knee. One hand of the examiner is at the ankle to stabilize the part while the other hand is placed on the lateral side of the knee. The person is then asked to bend forward to feel the stretch in the gluteal region or the examiner pulls the knee towards the chest.
Cat-Cow Test:
Kneel on an exercise mat positioning your knees and feet hip-width apart, with your toes pointing towards your body. Slowly lean forward to place your hands on the mat, positioning them directly under your shoulders at shoulder-width with your hands facing down. Gently stiffen your core and abdominal muscles to position your spine in a neutral position, avoiding any sagging or arching.

Cat Position: Gently exhale and contract your abdominal muscles, pushing your spine upwards towards the ceiling and hold this position for 10 – 15 seconds. Allow your head to fall towards your chest, maintaining alignment with the spine.
Cow Position: Slowly relax and yield to the effects of gravity. Let your stomach fall towards the floor (increasing the arch in your low back) and allow your shoulder blades to fall together (move towards the spine). Hold this position for 10 – 15 seconds before returning to your starting position.
PART 2: Assess Lumbar Postural Control to Reduce the Risk of Lower Back Pain
Spinal stabilization exercises can be used to evaluate your level of lumbar postural control. When performing each exercise, see how well you can move your body into the correct position. Note any restrictions or difficulties. Then assess your ability to maintain the appropriate positions. During each of these exercises you will be able to explore your functional range of painless pelvic motion and increase your kinesthetic awareness. This will help you protect the joints from unwanted end-range loading and decrease the pain and pressure placed on your lumbar spine. The better you are at controlling and maintaining neutral pelvic positioning during physical activities, the less risk you will have of overloading your lower back. Try these 4 lumbar exercises to assess your level of postural control:
Pelvic Neutral Stabilization in Supine:
Begin by identifying a comfortable flat surface to lay on your back such as a mat or the floor. Position your back in a neutral position with your knees bent and toes facing forward. Pull your belly button in toward your spine, pushing your pelvis up toward the ceiling. Be sure to tighten your gluteus and hip muscles as you tilt your pelvis up. Hold for 5 seconds. Repeat for 3-5 sets.

To advance this exercise and gather more data on the force you are applying, you can use a tool such as a biofeedback pressure cuff. The cuff tracks how much pressure your core muscles apply as you perform pelvic neutral and can serve as an excellent tool for measuring your performance.

Now that you have performed this assessment, consider your performance. Findings from this exercise will be based on how difficult it was for you to get into the pelvic neutral position, maintain it, and which position you switch to when you become fatigued. If you noticed yourself rotating your pelvis backward, this indicates that you have tight abdominals and hamstrings and weak gluteal muscles, and would benefit from hamstring stretching and gluteal strengthening. On the other hand, if you tend to rotate your pelvis forward too much, it means you have tight hip flexors and spinal stabilizers and weak abdominal muscles. You would benefit from hip flexor stretching and abdominal strengthening.
Single Leg Bridge Test:

This test is a common lumbar extensor exercise that also serves as one of the simplest ways to assess lumbar control. As you perform a bridge from the floor it will require muscle activation from your gluteals and hamstrings. It will also challenge your ability to maintain proper spinal alignment as you experienced in the pelvic neutral exercise.
- Start by laying on your back with your hands by your sides, your knees bent, and feet flat on the floor. Make sure your feet are under your knees. Tighten your abdominal and buttock muscles.
- Raise your hips up to create a straight line from your knees to shoulders.
- Squeeze your core and try to pull your belly button back toward your spine.
- Slowly raise and extend one leg while keeping your pelvis raised and level.
- Hold for 5-10 seconds.
- Return to the starting position with knees bent. Then perform the lift with the other leg.
Quadruped Movement Tests:

Kneel on an exercise mat or floor, positioning your knees and feet hip-width apart, with your toes pointing towards your body. Slowly lean forward to place your hands on the mat, positioning them directly under your shoulders at shoulder-width with your fingers facing forward. Hip Extension: Slowly extend your left hip (raise and straighten the knee) attempting to extend it until it is at, or near parallel, to the floor without any rotation in the hip. Your goal is to keep both hips parallel to the floor. Shoulder flexion: Slowly flex your right arm (raise and straighten the arm) attempting to raise it until it is at, or near parallel, to the floor without any tilting at the shoulders. Your goal is to keep the both shoulders parallel to the floor.
Tip: The use of a light bar placed across the hips, parallel to the waistline of your pants, provides visual feedback to hip rotation and what corrections are needed. You may also use a bar across the shoulders to provide visual feedback for shoulder rotation. Your head should remain aligned with the spine throughout the movement.
PART 3: Perform Core Stabilization Exercises to Avoid Lower Back Pain
One of the most effective methods of preventing lower back pain is to add core stabilization exercises into your training routine. These exercises can be completed at the end of any conditioning regimen and take approximately 5-10 minutes to perform. Here are some great exercises to choose from:
Abdominal Bracing:
Recent evidence regarding the conservative management of lower back pain suggests that restoration of neuromuscular control of the deep core muscle is essential for effective treatment and prevention of lower back pain. Activating this muscle has been theorized to improve the stability of the lumbar spine and has been found to significantly decrease symptoms associated with lower back pain.

Abdominal bracing is an exercise shown to increase local spinal stabilizers and lumbar stability while minimizing the facilitation of superficial abdominal muscle activity. It is a movement in which you draw in the navel and sucking in the belly button towards the spine. Performing this exercise will allow you to improve control over your pelvic floor while activating and strengthening your deep core musculature.

To perform abdominal bracing, begin by lying face-up on the floor or a mat. Place your arms by your sides, pointing forward with elbows bent at 90-degree angles and palms down. Reach forward with your head, elongating your spine. Inhale deeply and slowly draw your navel toward your spine; avoid lifting your hips. Hold the peak position for five seconds and exhale. Inhale and return to starting position. Repeat this 10-12 times. Continue to progress this exercise until you are able to achieve holding the position for 30 seconds for 10 repetitions.
Stability Ball Exercises:
Once you have mastered the abdominal hollowing and breathing, it is time to challenge your ability to maintain proper position. One way to do this is to use a stability ball. It can be used to perform body weight exercises that challenge the core muscles while training your body to stabilize itself. There are some excellent stability balls on the market including the Thera-band Pro Series Stability Ball and the Power Systems Versa Stability Ball. Once you’ve selected a stability ball for yourself, try these exercises that will strengthen your upper and lower body while training your core musculature:
Seated Pelvic Neutral Hold Exercise:
Surprisingly, just sitting on an exercise ball is exercise. It requires subtle yet constant engagement from core muscles to remain balanced and centered on the ball. When you first use an exercise ball, sit at the center of the ball and place your feet flat on the floor. Roll your hip forward and then back. Find the place just in between those positions at the center which is also called the “pelvic neutral” position. Hold this position while balancing your seated bodyweight on the ball for 30-60 seconds. Repeat 3 times.
Seated Marching Exercise:

Sit on the exercise ball with your feet in front of you and flat on the ground. Lift one foot approximately 1-2 inches off the ground while keeping your other foot flat on the ground. Hold that position for 3-5 seconds and then put that foot back down. Switch to the other side. Repeat for 10 to 15 repetitions.
Wall Sit Exercise:

Place a stability ball against a wall and gently stand against it, positioning the top of the ball into the small of your back. Position your feet 6-12 inches in front of your body with feet hip-width apart and facing forward or turned out slightly. Then:
- Gently lean into the ball while leaning your weight back into your heels.
- Inhale and slowly lower your body, rolling the ball down the wall simultaneously, but keeping contact with your tailbone, lower, and midback against the ball. Focus on lowering your hips under the ball and pushing your pelvis back to reduce potential stresses placed on your knees.
- Lower yourself until challenged or until your thighs are parallel to the floor.
- Hold this position for 15-30 seconds.
- Then exhale to slowly straighten your legs, rolling the ball up the wall.
- Repeat this exercise for 2-3 sets total.
Bridging Exercise:

Lying face up, bend the knees and place the feet on top of a stability ball. Keeping the ball still, press through the heels and raise the hips into the air by squeezing the glute muscles. Rest on the shoulders and the upper back while keeping the body in a straight line from the knees to the head. Slowly lower the hips back down to the ground, keeping the ball still.
Shoulder Raise Exercise:

Start by lying on you stomach over the top of a properly-inflated stability ball, with both feet and hands on the floor, hip- and shoulder-width apart. Gently contract your abdominal/core muscles to stiffen your torso and slowly walk backwards until your stomach lies directly over the top of the ball with both legs extended and both feet firmly placed on the floor, hip-width apart. Your torso and legs should be in parallel alignment with your arms, resting on the ball. Exhale, fully extend both arms, and slowly raise them overhead (in line with your torso) in unison until they lie level with your torso. Your thumbs should point towards the ceiling. Hold this position for 3 seconds, inhale and slowly return your arms to their starting position. To increase the balance challenge, this series of exercises can be progressed by bringing your feet together behind you or raising one foot off the floor.
Tips: Avoid hyperextension in your lower back by raising your torso past parallel alignment with your legs. Also avoid shrugging your shoulders when performing the arm raises.
Plank Hold Exercise:

Lie on your stomach on an exercise mat or floor with your elbows directly under your shoulders and close to your sides. Contract your thighs to extend your legs and pull toes towards your shins. Contract your core and abdominal muscles to stiffen your torso. Slowly lift your entire torso off the floor, maintaining a stiff torso and legs. Avoid arching the low back, hiking your hips upward or bending at the knees. Avoid shrugging your shoulder and keep your shoulders positioned directly over your elbows with your palms facing down. Continue to breath and hold this position for 20-30 seconds. Progress the exercise by adding 5 seconds until you can perform it for 45 seconds. 60 seconds is optimal.
Putting It All Together
Once you have assessed your lower back flexibility and range of motion in part 1, identify which tests led to a feeling of pain or discomfort in your muscles. The tests you performed will provide you feedback about the tightness of your hamstrings, piriformis, back extensors, flexors, and rotators. The muscles that you noted as tight should be stretched twice daily for 30-60 seconds to help avoid lower back pain. Next, identify which tests for postural control in part 2 were the most difficult for you to perform. Typically, difficulty maintaining pelvic neutral and shifting to lower back hyperextension or hyperflexion are signs your postural control needs improvement. Choose the tests for postural control that were most challenging and turn them into exercises by adding them to the end portion of your exercise routine. Ideally, choose 2-3 tests and perform them as exercises by completing 2-3 sets of them for the prescribed time frames listed above. Finally, put it all together by selecting 2-3 of the core stabilization exercises and adding them to your flexibility and postural control to complete your lower back pain prevention program. Here is a sample individualized lower back pain prevention plan:
Low Back Pain Prevention Program:
- Hamstring Straight Leg Raise Stretch (90/90 Straight Leg Raise Test), 2 sets of 30 second holds
- Piriformis Stretch, 2 sets of 30 second holds
- Single Leg Bridge Exercise, 3 sets of 12
- Pelvic Neutral Holds, 3 sets of 30 second holds
- Plank Holds, 2 sets of 30 second holds to the front
- Stability Ball Shoulder Raises, 2 sets of 12
Overall, you can develop an individualized lower back pain prevention plan by using the assessments in part 1 and 2 and the core stabilization exercises in part 3. Once you have designed your program, implement it 3-4 times a week at the end of your regular fitness routine to achieve the best results. This will help you decrease your risk of lower back pain after or during hiking and walking by helping you improve your lumbar flexibility, range of motion, postural control, and stabilization.
Want to learn more exercises to make sure you stay happy and healthy on your next hike? Contact us now to receive a complimentary fitness consultation.
References:
Back pain prevalence and visit rates: estimates from U.S. national surveys, 2002.
Deyo RA, Mirza SK, Martin BI.Spine (Phila Pa 1976). 2006 Nov 1; 31(23):2724-7.
GBD 2013 Risk Factors Collaborators. Global, regional, and national comparative risk assessment of 79 behavioral, environmental and occupational, and metabolic risks or clusters of risks in 188 countries, 1990-2013: a systematic analysis for the Global Burden of Disease Study 2013 [published online September 10, 2015]. Lancet.
Jandre Reis, F. J., & Macedo, A. R. (2015). Influence of Hamstring Tightness in Pelvic, Lumbar and Trunk Range of Motion in Low Back Pain and Asymptomatic Volunteers during Forward Bending. Asian spine journal, 9(4), 535–540. https://doi.org/10.4184/asj.2015.9.4.535
Kim, M. H., & Oh, J. S. (2015). Effects of performing an abdominal hollowing exercise on trunk muscle activity during curl-up exercise on an unstable surface. Journal of physical therapy science, 27(2), 501–503. https://doi.org/10.1589/jpts.27.501
Petering, R. C., & Webb, C. (2011). Treatment options for low back pain in athletes. Sports health, 3(6), 550–555. https://doi.org/10.1177/1941738111416446
Steffens D, Maher CG, Pereira LSM, et al. Prevention of Low Back Pain: A Systematic Review and Meta-analysis. JAMA Intern Med. 2016;176(2):199–208. doi:10.1001/jamainternmed.2015.7431
Waterman, Brian R., MD1; Owens, Brett D., MD2; Davey, Shaunette, DO1; Zacchilli, Michael A., MD1; Belmont, Philip J. Jr., MD1 The Epidemiology of Ankle Sprains in the United States, JBJS: October 6, 2010 – Volume 92 – Issue 13 – p 2279-2284 doi: 10.2106/JBJS.I.01537
Disclaimer: Exercise is not without its risks and this or any other exercise program may result in injury and/or death. Any person who undertakes these exercises does so at their own risk. To reduce the risk of injury you should consult your doctor before beginning this or any other exercise program. As with any exercise program, if at any point during your workout you believe conditions to be unsafe or begin to feel faint or dizzy, have physical discomfort, or pain, you should stop immediately and consult a physician. It is important to perform exercises properly to avoid injury, it is recommended that you acquire help and teaching in order to undergo any new exercise program safely.
Ellie Davis
I liked that you mentioned you need to consider your status to reduce back problems after hiking. My husband’s friends have been planning a hiking trip, and we are looking for advice since he had back problems in the past. I will let him know about your recommendations to understand the benefits of visiting a professional to assess my husband’s back. https://www.back2ultimatehealth.com/about-us/what-we-treat.html
Delmer Viramontes
Most acute low back pain results from injury to the muscles, ligaments, joints, or discs. So it very dangerous to those hikers that are connected with computer related jobs. Because a user who sit for long hours also affected by back pain.