How To PREVENT Foot Blisters While Hiking and Walking – Part 1
In this 3-part series, we provide tips and best practices on how to treat and prevent foot blisters that occur during a hike or an arduous walk.
You’re reading Part 1: How to PREVENT Foot Blisters While Hiking and Walking
Part 2: How To TREAT Foot Blisters During and After Hiking and Walking
Part 3: The Best Hiking and Walking SOCKS to PREVENT Blisters
Learning how to prevent foot blisters will save you miles of pain and suffering while you’re hiking – as well as saving you (and your hiking mates) from having to stop every so often to treat your blisters.
Keeping your feet dry, cool, and friction-free is key to keeping your feet blister-free. This article will share how to prevent foot blisters and give you a list of the products that will help and where to get them.
Understanding How Blisters Form Can Help You Prevent Them While Hiking and Walking
Blisters on the feet are caused by a combination of moisture, pressure, and friction. Often while hiking, a boot or sock rubbing on the foot can be the culprit of a friction blister. The friction causes the layers of skin to separate (epidermis from the dermis), moving independently of each other instead of moving together as a unit. Initially, the skin area is tender to the touch and becomes red and inflamed. If the friction continues, the layers of skin separate, filling the area with fluid. It is the pressure from the fluid or blood (if a break in a small blood vessel occurs) that causes the pain because the pressure stimulates the nerves under the skin.
Try this: Put your hands together and rub them against each other hard and vigorously for ten seconds.
Did you feel the heat building up from the friction? This is the same process that creates blisters.
Friction heat causes an abrasion of the epidermal layers, releasing fluid under the skin in the form of a blister. In some ways you can think of it as a burn. This feeling of heat and friction that precedes an actual blister is called a “hot spot.” This is the perfect time — before getting the blister — to take action to prevent blister formation. The two things you can do to prevent foot blisters from forming are:
- Reduce the amount of friction being applied to the area.
- Protect the affected area from further damage.
What are the best tape and techniques to prevent blisters while hiking and walking?
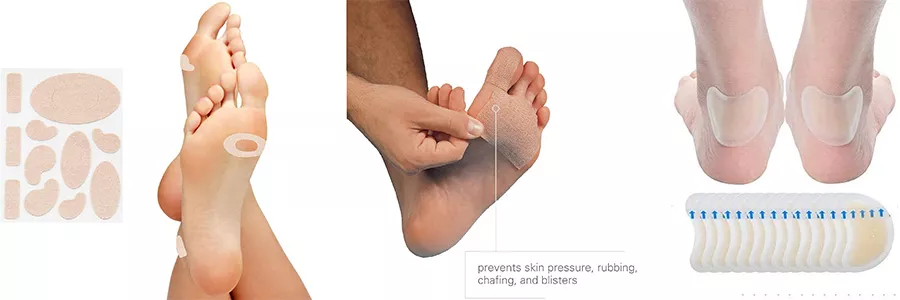
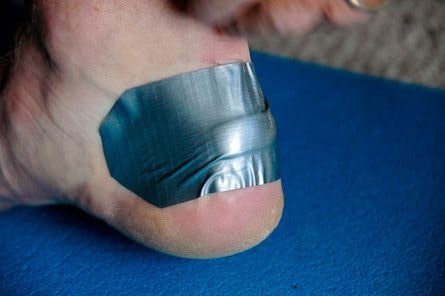
For those prone to blisters (narrow heels slipping in boots or toe rub), placing tape to cover the affected area can be quite beneficial. If shoes are rubbing on your heels, use a piece of one inch or wider tape about ten inches long:
- Apply on clean, dry feet — place the center of the length of tape over the point that is blister prone.
- Lay the tape down smoothly on the skin, taking care to not get any folds.
- Wrap the two ends across each other so tape is sticking to tape.
- Cut off the excess.
- Tape your feet and toes around the prominent spots where blisters usually occur (big toe, little toe, heel).
The key is getting a good, clean surface to stick to and using a good quality tape. Use the same method for areas on the ball of the foot. Leukotape P Sports Tape has become a long-distance hiker favorite for blister prevention. You can also use a friction minimizing tape such as Moleskin or opt for a flexible tape such as KT Tape.
If your sweaty feet won’t hold the tape well and rolls up after a while, try using Tincture of Benzoin prior to taping. It will form a tacky surface on your skin which will hold the tape in place. Spread the tincture over the area to be taped. Let it air dry for 3-4 minutes, then lay down the tape. Take care to lay the tape smoothly without creating wrinkles.
If you have toes prone to blisters, you can do something similar. For toes, use narrow tape (one-half inch). Wrap the toe with three turns, each turn lying about halfway over the prior one. Start and finish the wrap on top of the toe.
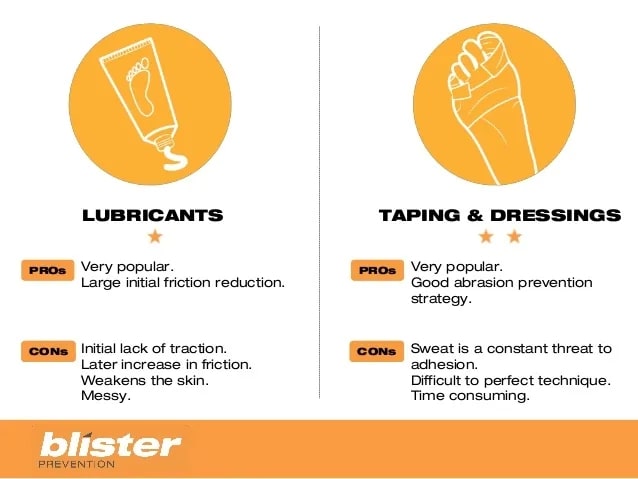
Some hikers say putting tape adherent directly over the hot spot doesn’t prevent blisters from forming
When used during physical activity, the sticky portion of the adherent can further irritate the skin and begin rubbing against it during movement. If you are inclined to experiment with this technique, make sure to do so on short, single-day hikes.
If you’re prone to friction blisters between toes, use a skin anti-friction lubricant gel such as offered by BodyGlide, Monistat or Lanacane. A lubricant can be used on other places on your body that get friction rash, too, such as when you are wearing sweaty clothes for hours on end.
Another method for treating toes:
- Start with clean feet — wipe with alcohol to remove dirt, moisture, and skin oils.
- Coat your blister prone areas with tincture of benzoin.
- Let it air dry for 3-4 minutes — it will be sticky.
- Apply a lubricant over the tincture of benzoin. Vaseline will work, but the formulated types such as Body Glide, Sport Stick, and similar will work longer.
- The lube will need another application after 4-5 hours of walking.
One thing to note: some studies have shown that lubricants such as Vasoline are not an effective tool when trying to prevent foot blisters. The reason is that a lubricant initially acts to decrease friction, but it loses its traction and increases friction after a short period, leading to weakened and susceptible skin. However, we do recommend experimenting to see if anti-friction lubricants are effective for you personally.
For those with really sweaty feet, use antiperspirants to prevent blisters while hiking and walking
Antiperspirants for feet are most effective if they are applied to clean feet just before bedtime and worn with a clean, dry pair of thin socks (your designated sleeping socks). The antiperspirant will soak into your skin overnight and result in less foot moisture the next day. Foot powders are nice to use before bed if you are not hiking the next day. The military did some testing on these products. Soldiers who used foot powders before maneuvers actually got more blisters than those who didn’t use powder. The powder acts as micro-grit once it becomes moist and rubs the foot with a sandpaper-like effect, so keep your foot powder for end of day use when your feet are dry.
Foot Antiperspirant recommendations:
Certain Dri Antiperspirant Roll On 1.2oz
Carpe Antiperspirant Foot Lotion (Prevent Sweaty Feet, Block Sole Sweat)
Let your feet dry out after hikes to prevent blisters or allow them to heal
It’s a good idea to remove the sweaty socks post-hike or at your campsite. If you are spending the night at the campsite, clean your feet with alcohol wipes or rinse them in the nearby creek; keeping your feet dry and clean will help prevent blisters on multi-day hikes. Once they’re clean, slide your bare feet into some Chaco sandals, slides, or flips. If you are driving home from your hike, you can slide on some dry-comfortable socks and slip into the Classic Crocs Clogs.
If you do get a blister, then you’ll need to know how to treat foot blisters during and after hiking and walking.
Properly fitting hiking boots and trail shoes can go a long way toward preventing most blisters
However, don’t be fooled into thinking you can’t get a blister because your shoes feel perfect. A true story from a trip I led: My friend had heard about a famous master bootmaker in New Hampshire. We went to the bootmaker and had my friend’s feet measured and molded. A few months later my friend received his custom-made heavy leather boots. The boots were fitted for the slight differences of each foot (which we all have). He worked in the yard and went on a few neighborhood walks. He never wore them more than a couple of hours at a time, yet declared they were perfect.
We hit the trailhead lugging our 50 pound packs, and the first mile was a steep uphill grade. The constant heel rub that resulted from the stiff boots gave my friend a blister within the first mile of a week-long backpacking trip in the Rockies.
Needless to say, he was miserable all week and did no side hikes to waterfalls, peaks, or grand vistas. I wish I had known then what I know now about blister prevention.
Buy your hiking footwear from a knowledgeable outdoor store to maximize blister prevention
They can help you pick the right boot or shoe for your intended use and fit you properly, allowing for such things as foot swell after hours of hiking. You will probably have to try several different pair in order to find the proper fit so allow adequate time for the task. The store should have a slant-board so you can test for downhill toe room and heel slippage. Also, it is best to visit the store later in the afternoon when your feet have swollen to near their maximum size (yes, feet change sizes when in use, particularly while hiking).
A knowledgeable salesperson should also show you different lacing techniques to help get a better fit. If you have arch issues, a different insole may help attain a better fit (performance insoles such as Super Feet, Sole, and Sof Sole are all good.) It is a good idea to take socks that prevent blisters and your preferred insoles in with you to use when trying on new footwear. Socks can be used to “fine tune” the fit if done properly.
If you purchase shoes online, use these tips to minimize blisters from forming
If the shoes are too tight, it could increase pressure on your foot, and if they are too loose the shoe will rub against your skin. Instead, stand up in your shoes or boots and make sure you have a thumb’s width of clearance between the end of your toes and the insole. You want that extra space in the front of the boot so you don’t end up jamming your toes against the toe box on the way down.
Before you purchase footwear, find out the store’s return policy
Take the new boots or trail shoes home and wear them around your house actively for a while to make sure they are comfortable. This way you can still exchange them for a different pair if needed (i.e., don’t wear them outdoors just yet). Once you’re satisfied with the fit, start taking long neighborhood walks and then actual hikes. Some problems may not show up until your feet are hot, sweaty, and tired.
Full leather boots typically need a “break-in” period
Take time to wear them in advance of your trip to check for any irritations or hot spots. This is truer for all-leather boots, such as the classic full leather Asolo TPS backpacking boot. Essentially, this means you should gradually begin to use your new boots well before your trip. Heat, sweat, and movement will get the boot and your foot used to each other and give you a chance to check for “hot spot” foot irritation.
Don’t start a trip with brand new boots
Small areas can sometimes be stretched out a bit by a good cobbler to allow for bunions, calcium deposits, and other unique fit issues. Break-in is less important for many of the leather/synthetic blends that are on the market today, such as the Asolo Fugitive, the La Sportiva Trango, or the Vasque Breeze. However, it’s a good idea to get used to your new footwear incrementally as a way to prevent blisters while hiking.
These days not all shoes need breaking-in time as stiff leather boots do
In this era of lightweight gear, many long and short distance hikers prefer trail shoes over boots with no break-in required. Examples of excellent trail brands are Hoka, Salomon, Altra, Columbia Montrail, LA Sportiva.
Proper fitting shoes prevent foot blisters – price has nothing to do with it
If your boots don’t fit or support your foot properly when on the trail, you’d gladly pay the $25-50 you saved to make your foot pain go away. Price doesn’t necessarily equate to a good fit. Go for the good fit regardless of the price.
Choose the best socks to prevent foot blisters while hiking and walking
The next step after choosing proper fitting footwear is to find the right socks to reduce friction and manage moisture. This will reduce the possibility of a hot spot developing.
Preparation and prevention are the keys to avoiding blisters
Those who do not hike regularly may have never experienced a debilitating blister on the trail. It is a painful lesson to learn.
The military did some testing and found that soldiers who wore their boots for 20 hours over a two week period prior to maneuvers had far fewer blisters than those who did not. While doing your training hikes, take time to pay attention to how your feet feel. Boot and shoelaces that are too tight or too loose can be the cause of hot spots on your feet. Your feet swell as you hike, and your boot laces may need adjusting to accommodate the situation.
It takes time to condition your feet, so make sure that it is a part of your trail fitness plan. You want to ensure you have a fitness and conditioning plan that includes extended walks/hikes to get your body in shape and to adapt to the rigors of long hikes. This fitness plan should include getting your feet in shape.
References:
Worthing RM, Percy RL, Joslin JD. Prevention of Friction Blisters in Outdoor Pursuits: A Systematic Review. Wilderness Environ Med. 2017;28(2):139-149. doi:10.1016/j.wem.2017.03.007
Disclaimer: Exercise is not without its risks and this or any other exercise program may result in injury and/or death. Any person who undertakes these exercises does so at their own risk. To reduce the risk of injury you should consult your doctor before beginning this or any other exercise program. As with any exercise program, if at any point during your workout you believe conditions to be unsafe or begin to feel faint or dizzy, have physical discomfort, or pain, you should stop immediately and consult a physician. It is important to perform exercises properly to avoid injury, it is recommended that you acquire help and teaching in order to undergo any new exercise program safely.