How To TREAT Foot Blisters During and After Hiking and Walking – Part 2
In this 3-part series, we provide tips and best practices on how to treat and prevent foot blisters that occur during a hike or an arduous walk.
Part 1: How to PREVENT Foot Blisters While Hiking and Walking
You’re reading Part 2: How To TREAT Foot Blisters During and After Hiking and Walking
Part 3: The Best Hiking and Walking SOCKS to PREVENT Blisters
Although developing blisters on your feet are a reality of hiking, there are many ways to help reduce the chances of them occurring and treat them effectively.
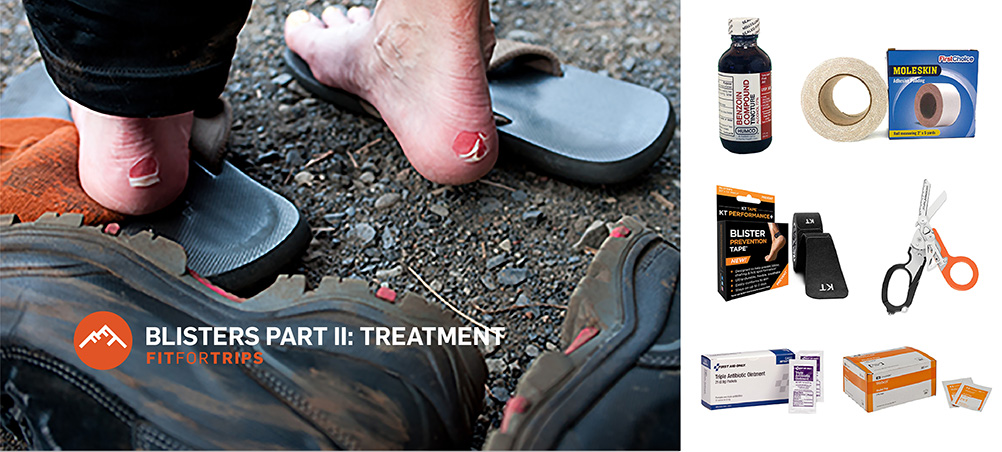
First Things First: Familiarize yourself with some of the helpful foot blister treatment products you will be taught how to use later.
-
These items make up your blister-treatment kit and part of your hiking First Aid pack. These provide solutions for stage I and II foot blisters:
- A package or roll of moleskin, which comes in thin ($9.96) and thick versions ($29.20). It’s good to have both if you are prone to getting blisters and/or to treat fellow hikers. Thin will do most of the time.
- Tincture of Benzoin ($9.85) comes in a small bottle or ampules. It’s tacky properties help moleskin or tape stick to damp, sweaty feet.
- Athletic tape like KT Tape ($9.99), RockTape ($18.49), Kinesio Tape ($9.97) or Leukotape P ($8.03) can be used prior to the hike to cover an area prone to blisters (does not work on all trials) or to hold moleskin in place.
- Alcohol wipes ($5.28) to clean the affected area and dry the skin.
- Antibiotic ointment ($4.58) (triple antibiotic ointment preferred).
- Small first aid scissors ($80.00) or lighter weight mini trauma shears ($5.84) for cutting tape on skin.
- Sewing needle or small safety pin.
-
These are some items used to treat blisters in stages III and IV:
- Waterproof Hydrocolloid Bandages ($10.99) pre-cut into different shapes.
- Cover stage III and IV blisters with appropriate size bandages or non-adherent pad ($12.37).
- Self Adherent Wrap Medical Tape ($9.99) to hold bandages in place.
- Spenco 2nd Skin in all shapes and sizes.
Every spring I run into Appalachian Trail thru-hikers who are hiking in their camp shoes — usually Chaco sandals, Crocs, or similar. Invariably, they could no longer hike wearing their boots or trail shoes due to blisters. Their goal then becomes hobbling along to the next “zero day” in town so they can stop hiking long enough to treat foot blisters. In this article, we will teach you how to treat blisters on your feet so you can back to hiking on the hiking trail in no time.
Whether you are going backpacking, trekking, or hiking, you can’t give it your all if you’re in pain—and nothing puts a damper on your outdoor performance like getting a blister a few miles into your adventure. Studies in wilderness and environmental medicine have shown that friction blisters will affect over 50 percent of active backpackers and hikers.
Carrying a few small items to treat hot spots on your feet and toes, as well as a little knowledge, can help you hike comfortably and prevent painful foot blisters that can ruin your trip. When you properly take care of it, a blister can start to recover in six hours and is no longer painful after about 48 hours. Improper care, on the other hand, can result in a lot of walking pain and a blister that becomes an infected mess filled with bacteria.
Basic Treatment for Foot Blisters
Here are a few basic steps to follow in order to treat blisters on your feet and safely aid in the healing process of your skin:
- It is important to note that the skin overlying the blister is protective and should remain in place as long as possible. A common mistake is to remove the overlying skin of the blister. This exposes the underlying skin to possible infection & causes increased pain because raw nerve endings can be exposed.
- Leave the blister alone! Do not pop, drain, open, or trim your blister—this is the most common cause of infection. Allow it to pop on its own and try to keep the skin intact, if possible. There are exceptions to this rule we will cover later.
- Cover and treat the blister based on the stage of formation and healing it is in.
- After your hike or trek, allow your blister to dry out—soaking your feet in a warm Epsom salt bath will help. If possible, keep the blister uncovered overnight.
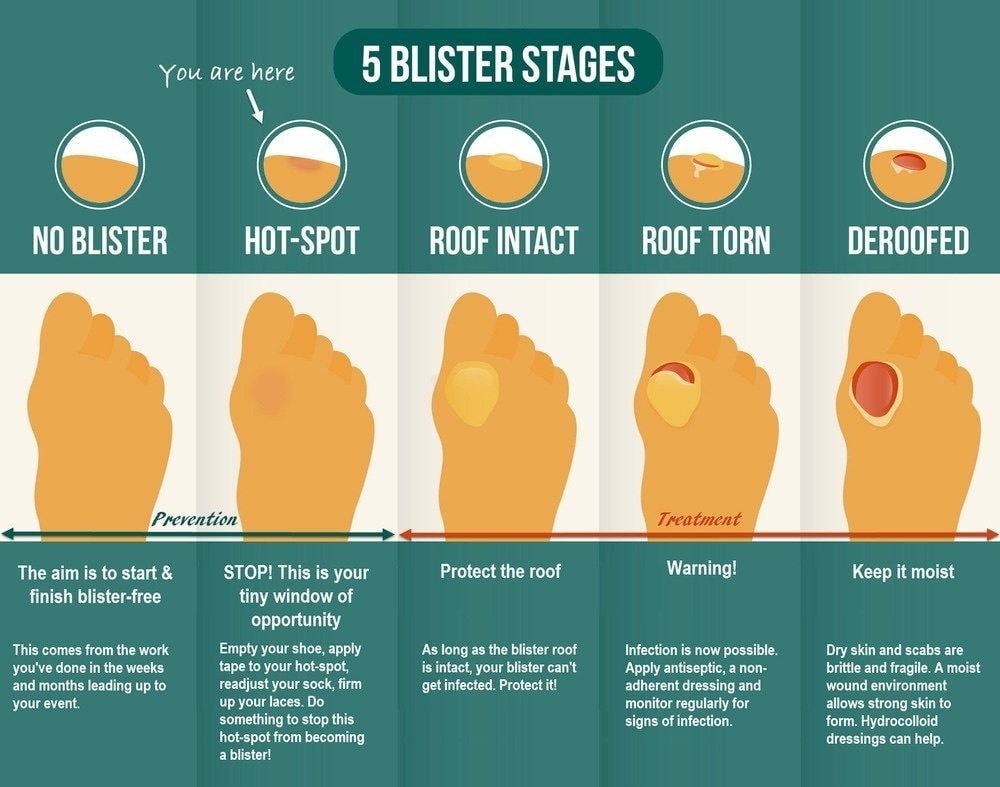
How to Treat Foot Blisters: Guidelines for Stages I thru IV
STAGE I: If the blister has not fully formed and you have a “hot spot,” the goal is to decrease friction to the area and reduce the chances it develops into a blister.
STAGE II: If the friction blister is a closed blister with no openings, the goal is to protect the blister and allow it to heal.
STAGE III: If the friction blister is an open blister with a small tear, the goal for treatment is to keep as much skin tissue as possible to allow the underlying skin to mature. The treatment for an open blister includes the following:
- Clean the area thoroughly with antiseptic soap
- Allow the area to dry and apply antibiotic ointment to the open wound
- Replace the flap of skin (if possible) to cover the treated tissue and cover with a sterile, non-adhesive dressing
- Check wound and change dressing daily until skin has healed
- After a few days when the tenderness is gone, carefully trim away the dead skin
STAGE IV: If the friction blister is an open blister that has completely torn, it is important to remove the torn tissue so that it is not at risk for tearing into healthy skin.
- Start by cleaning the area with antiseptic soap
- Next carefully remove the skin with sterile scissors
- The area can then be covered with antibiotic ointment or an occlusive dressing such as 2nd skin or gel guard adhesives.
- Note: Because the underlying tissue has lost its protective covering, the area will be tender for a few days.
Healing occurs most rapidly when a blister is left intact. Leaving the skin intact helps prevent infection from occurring caused by sweat or bacteria within your hiking boots or sneakers. If the blister is left intact, the initial healing process should take place within two to three days, and it should be completely healed within two weeks.
Examples of How to Treat Foot Blisters While Hiking:
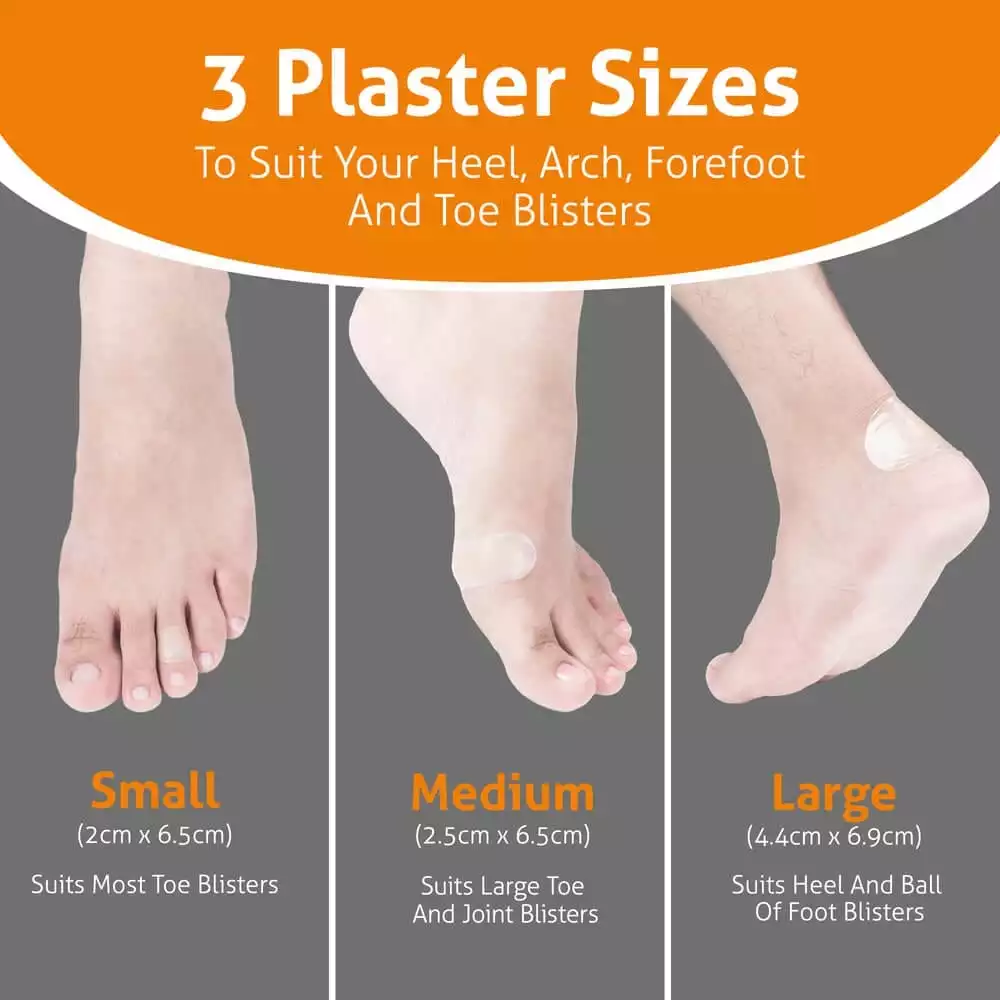
While blisters can occur anywhere, they pop up most often in three places: the heel, borders of the metatarsals (below the toes), and the top of the foot. Here are three ways to treat blisters you can choose based on the state of blister you are dealing with:
Treatment Technique 1: Moleskin Donut Pad for Closed Blisters or Hot Spots – Stage I & II Blisters
- Locate the hot spot (or small, newly formed blister) on your foot.
- Clean the area to be treated with alcohol wipes, which will remove the moisture and body oils, allowing the adhesive to stick much better.
- If you have tincture of benzoin (a type of tree sap), apply it around – but not on – the hot spot, basically where the moleskin will lie.
- Grab the sheet of moleskin and apply it this way: cut a square piece of moleskin about one-half inch larger than the hot spot.
- Fold the moleskin piece in half.
- Cut a hole into the middle of the folded sheet. Make the hole just big enough to surround the hot spot without touching it. You want the hot spot to remain in a pressure-free “donut hole.”
- Trim the outside corners of the moleskin square so it now has eight sides — it’s the points of the corners that tend to pull up first (especially if tincture of benzoin wasn’t used). If the moleskin square is larger, for example two inches square, you may want to trim the points twice to make it more of a circle without corner points.
- In some situations, you may need to use a piece of tape to hold the moleskin in place. Just cut a little hole in the tape above the “donut hole” in the moleskin. Allowing the skin to breathe will quicken the healing process.
The hot spot will often be gone when you wake up the next day; a little blister will still be tender, so you may to want to cover the spot with moleskin and tape to prevent further issues. For a little blister you’ll definitely want to use moleskin for a few days.
When you do notice a hot spot, don’t hike for another hour thinking it will go away. Stop and take care of it. If the laces just need some adjustment, great; but if a lacing change doesn’t help, take time to stop, sit down, and pull off that sock. Yes, your buddies may give you a hard time for stopping, but it’s your foot feeling the pain, not theirs.
However, part of the problem causing the hot spot is moisture. Once you start hiking, moisture is going to form under the tape. Due to the removal of friction by the tape, the hot spot may not increase in intensity, but you’ll still feel it. Therefore, I prefer to treat a hot spot with the same method as a newly formed, small blister described in the 8 steps above.
One way not to treat a foot blister? Popping it.
If the blister is the size of a nickel and filled with fluid, you may be tempted to pop it – but you don’t want to do that.
Try to handle the blister without popping it for a few days. If it is properly treated, the body will absorb the fluid and start growing new skin under the hermetically sealed protection of the blistered skin. Opening a blister offers a warm, moist path that bacteria just love (foot odor comes from the bacteria on your feet). We will address an open blister in a moment — just know that opinions on this differ widely and recommendations seem to change as often as Daylight Savings Time.
The treatment for a small blister begins the same as for a hot spot:
- Clean the area and spread some tincture of benzoin on the skin around the blister.
- Put some antibiotic ointment on the blister to keep bacteria away (just in case it does pop while you’re walking).
- Cut a piece of moleskin as explained above. Since the piece of moleskin will be fairly large, take time to trim all the corners so that it is quite round.
- Make sure the hole in the middle doesn’t touch the blister. Consider how the moleskin will be compressed with boot on — you don’t want anything to touch the blister. If in doubt, add a second layer of moleskin (or a thicker type) to ensure protection of the blister.
- Tape the moleskin in place so it won’t move while you are walking. Cut tape strips long enough to reach around your foot in order to hold the moleskin firmly, then tape across with a second piece of tape at a right angle to hold the ends of the first tape layer in place.
As a side note: Super Glue on top of a hot spot works pretty well (don’t use it on a blister, though), but not many hikers carry a tube of Super Glue in their kits.
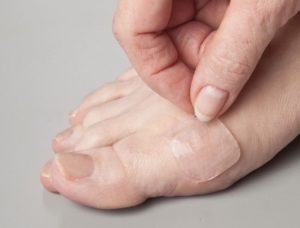
These photos demonstrate use of Moleskin material to create a ‘donut’ pad that protects the blister from further friction.
The technique is the same as Steps 1-3 above but slightly different from Step 4 and on. Both are effective, so choose or experiment for yourself.
1. Cut the Moleskin or padding material into the shape of a circle.
2. Then cut a hole into the middle of it that is the size of the hot spot or blister.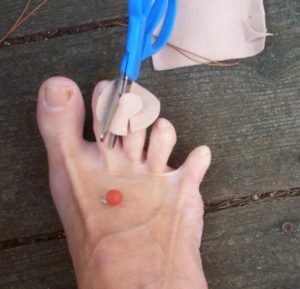
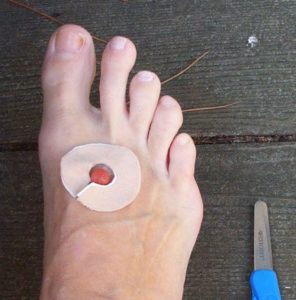
The material used should be adhesive and thin. Using a pad that is too thick will be counterproductive and most likely not fit into a shoe or boot.
 3. Covering the donut pad with a tape adherent is the final step of the donut pad. Use KT tape, RockTape, or Kinesio Tape.

Treatment Technique 2: Second Skin for Stage III & IV Blisters
1. Begin by purchasing the Second Skin material for blister treatment.
2. Next, use sharp scissors to cut out a piece the shape of the blister and just larger than its size.

3. Peel the covering from the material to expose the ‘sticky’ portion.
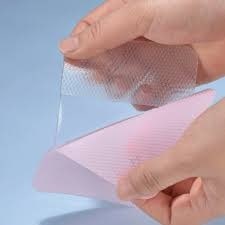
4. Apply the sticky portion of Second Skin to the blister.
5. Cover with a bandage or non-adherent pad and flexible style athletic tape. Mobilize the joints through their full range of motion.
Treatment Technique 3: Hydrocolloid Plaster Dressings for Stage III & IV Blisters
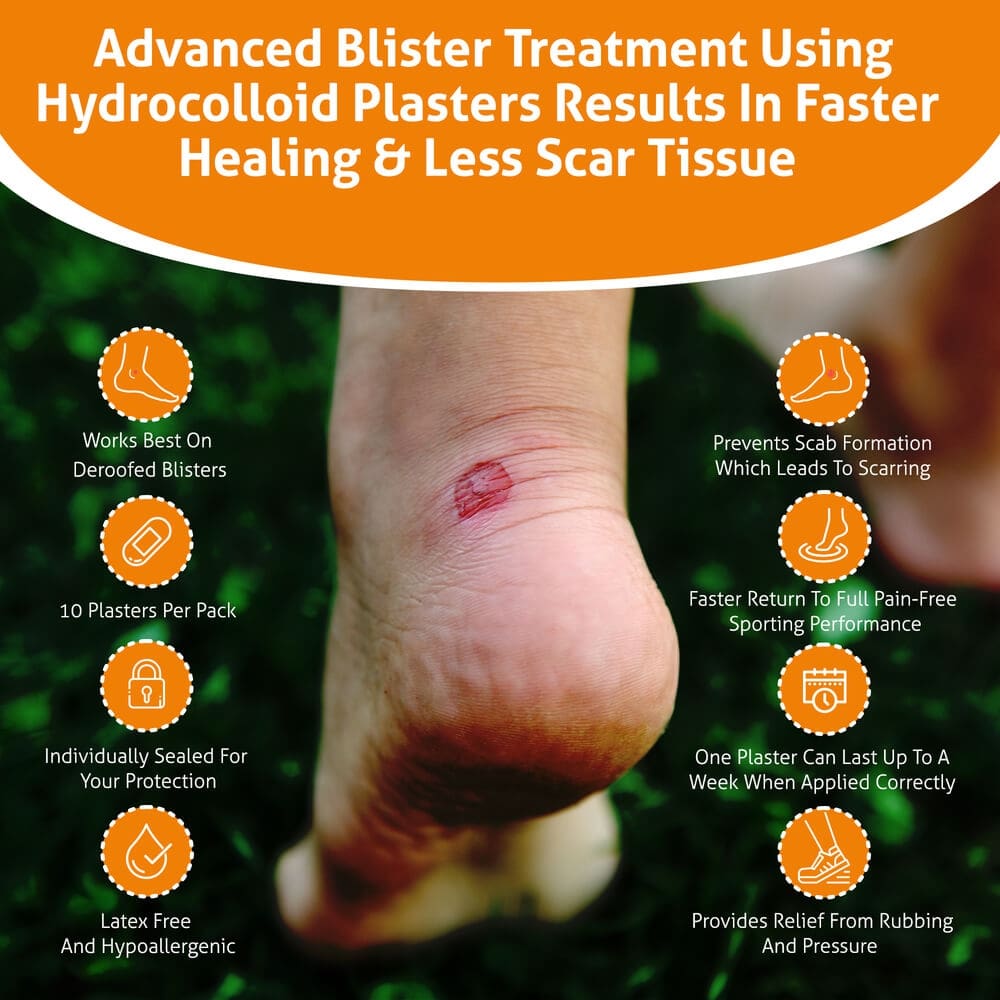
When a blister is fully opened, also know as deroofed, it is important to keep it moist to protect the exposed skin and allow it to regrow in a safe environment.
1. Choose a hydrocolloid dressing, which is any dressing that contains a gel forming agent.
- As a deroofed blister weeps, the dressing material absorbs the fluid and changes to a white color indicating it is time to change the dressing.
- Depending on the manufacturer, some dressings are pre-cut into a shape that suits the body area (such as the Achilles). Others will come in rectangular sheets and can be cut to fit the blister.
2. Apply the dressing directly to the blister, being careful to ensure the adhesive portion is outside of the area in which the blistered skin is located.
Popping blisters is controversial, but if you have to do it there is a proper technique.
There are some rare occasions when popping is actually a good way to treat foot blisters. A blister in a stressed area of the foot (the heel or ball of the foot being common ones) is a good reason for popping it as part of the treatment. Even if a blister popped while in the boot, the treatment is almost the same. Leave the skin in place whether it’s already popped or not.
Your First Aid kit should have a few safety pins and ideally, a sewing needle.
- Sterilize the needle (or safety pin sharp point) with soap, alcohol, or heat until it glows red.
- Pierce the blister at its lowest side close to the foot to enable the fluid to drain.
- Massage the blister with gentle pressure to push the fluid out.
- Once the fluid has drained, dry and clean the area of the blister again.
- Apply antibiotic ointment on the blister and around the drain hole to prevent the entry of bacteria into the blister.
- Now apply tincture of benzoin to the surrounding area where the moleskin will be placed.
- Apply two pieces of shaped moleskin (or one layer of thicker brand), one on top of the other. The blister spot is going to be very tender and sore so make sure it’s protected.
- Tape the moleskin in place so it won’t move while you are walking. Cut tape strips long enough to reach around your foot in order to hold the moleskin firmly.
- Then tape across with a second piece of tape at a right angle to hold the ends of the first tape layer in place.
- Replace the blister covering the next day, before the tape or moleskin starts to lift and cause additional problems.
Even the tiniest foot blisters can cause a lot of pain, but don’t think treating them is a one-size-fits-all deal.
The best way to respond actually depends on the stage of the blister. If it is a hot spot, decrease friction to the area to minimize the chance it turns into a blister. If it’s a closed blister, use one of the techniques suggested to protect it through a dry, non-adherent padding. If it’s partially or fully opened, it’s time to disinfect and use a moist adherent bandage. Minimizing the chances of developing blisters starts by identifying the hot spots you are prone to and ensuring you choose the best footwear and socks for your feet. By focusing on these areas, your hiking experience will be much more enjoyable, and you can reduce the chances of blisters developing.
Learning how to treat foot blisters is just one part of the equation. Contact us today to set up your complimentary fitness consultation to ensure you’re in the best shape possible for your adventure.
References:
Anderson LS Jr, Rebholz CM, White LF, et al. The impact of footwear and packweight on injury and illness among long-distance hikers. Wilderness Environ Med. 2009; 20:250–256.https://www.wemjournal.org/article/S1080-6032(09)70129-2/fulltext
Twombly SE, Schussman LC. Gender differences in injury and illness rates on wilderness backpacking trips. Wilderness Environ Med. 1995;6:363–376. https://www.sciencedirect.com/science/article/pii/S108060329571078X
Disclaimer: Exercise is not without its risks and this or any other exercise program may result in injury and/or death. Any person who undertakes these exercises does so at their own risk. To reduce the risk of injury you should consult your doctor before beginning this or any other exercise program. As with any exercise program, if at any point during your workout you believe conditions to be unsafe or begin to feel faint or dizzy, have physical discomfort, or pain, you should stop immediately and consult a physician. It is important to perform exercises properly to avoid injury, it is recommended that you acquire help and teaching in order to undergo any new exercise program safely.
Rob S.
These are great ways to help reduce the likelihood of blisters forming when you’re on a simple walk, a hike, or what have you. Having the right footwear goes a long way, so make sure that you take the time to walk around in new shoes to ensure that they are comfortable for long trips.
DMZABO
Blisters can ruin your day. Or week for that matter. Didn’t notice mine till it was already de-roofed. Pretty big too. Mine is on the bottom of the foot just underneath the baby toe. Antiseptic washed and hoping it doesn’t get infected. Looks like I won’t be doing my daily walk for a while. I just put in a new pair of insoles/inserts and I think that is what did me in. The shoe was worn but not the insert. Lesson learned. Thanks for all the really informative information.
Marcus Shapiro
Just returned from an epic Arizona hike. On Day 3 we did the 1 Day R2R. All of us had some hot spots after day 2 and applied either KT Tape or this Band-Aid product; just applied directly to the skin. Worked great…
Kevan Lester
Having engaged in a number of arduous mountain walks and the like I have found that taping my feet (particularly the heels) – prior to embarking on such activities, has resulted in an absence of “hot spots” which is a precursor to formation of blisters. As an added bonus, it also has the effect of less ‘feet ache; which when covering long distances over consecutive days, is a godsend.
Prior to habitually taping my feet with zinc oxide tape, I did occasionally suffer from blisters – the identified treatment a suggested on this site was used as part of my treatment regime to good effect. That said, my preventative treatment to reduce the incidences of blisters has been used by me to good effect for over 20 years.